When I first started photography, I felt like I was stepping into an alien world. Shutter, aperture, ISO — these terms felt like a language I didn’t speak. At first, I had no idea how all these settings worked together, and I was lost in auto mode. I would take pictures, but they weren’t coming out the way I imagined. My camera was calling the shots, not me.
I still remember the days when I would just leave the camera on auto mode, letting the camera decide everything for me. I was clicking shots left and right, hoping for a good image, but something felt off. Sure, the photos were decent, but they weren’t the images I had in mind. The camera was deciding what to focus on and how the light should play in the frame — not me.
It was then that I realized, if I wanted to call myself a photographer, I had to understand what was happening behind the scenes. I couldn’t just rely on auto mode anymore. I had to take control.
The more I thought about it, the more I understood that the key to unlocking creative photography lay in a concept called the Exposure Triangle. Now, I’m not going to bombard you with complex jargon. No, we’re going to take it step by step and break it down in the simplest way possible, like we’re chatting over a cup of coffee.
Table of Contents
ToggleThe Power of the Exposure Triangle
The Exposure Triangle is the magic formula behind every photograph. It’s the foundation that controls how light enters your camera and influences the image you capture. It’s like the DNA of every shot, no matter what you’re photographing.
Imagine a triangle, with each side representing a critical component of photography. When you learn to balance these three sides, you unlock the power to create perfectly exposed photographs. It’s as simple as that.
Let’s break it down:
- Aperture
- Shutter Speed
- ISO
Aperture:
This controls the size of the opening through which light passes into the camera. A wider aperture allows more light to enter, while a narrower aperture allows less light to enter. A wider aperture also creates a shallower depth of field, blurring the background behind the subject, while a narrower aperture creates a deeper depth of field, keeping both the foreground and background sharp.
Shutter Speed:
This determines the duration for which the camera’s shutter remains open, allowing light to enter. A slower shutter speed lets in more light, resulting in a brighter image but a blurrier image, while a faster shutter speed lets in less light, creating a darker image but a sharper image.
Shutter Speed Counts: A Simplified Explanation
Shutter speed is typically expressed in fractions of a second, represented by numbers like 1/100, 1/1000, and 1/125. To decipher these counts, imagine a second as the denominator and the number following the slash as the numerator.
- 1/100: This indicates that the shutter remains open for one-hundredth (1/100) of a second.
- 1/1000: Here, the shutter is open for one-thousandth (1/1000) of a second, an even shorter duration.
- 1/125: In this case, the shutter remains open for one-hundred-twenty-fifth (1/125) of a second.
ISO: Unveiling the Camera's Sensitivity to Light
In the realm of photography, ISO stands as a crucial setting that governs the camera sensor’s sensitivity to light. It plays a pivotal role in determining image quality, particularly in low-light conditions.
Understanding ISO: A Simplified Explanation
ISO is represented by numbers ranging from 100 to 6400 or higher, depending on the camera’s capabilities. A lower ISO number (e.g., 100, 200) indicates lower sensitivity, meaning the sensor requires more light to produce a properly exposed image. This results in less noise in the image but may limit your ability to shoot in dimly lit environments.
On the other hand, a higher ISO number (e.g., 400, 800, 1600) signifies greater sensitivity, allowing the sensor to capture images with less light. This is particularly beneficial in low-light situations, enabling you to handhold the camera without relying on a tripod or flash
Balancing the Light: How They Work Together or how the exposure triangle work
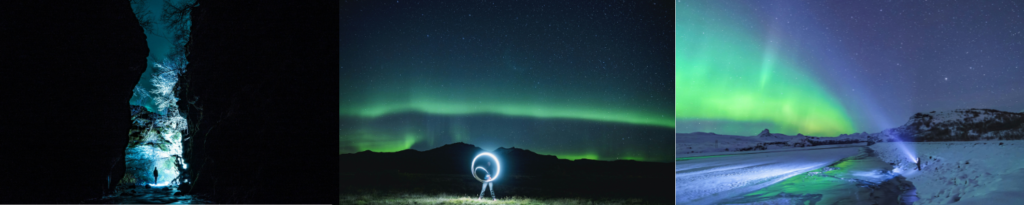
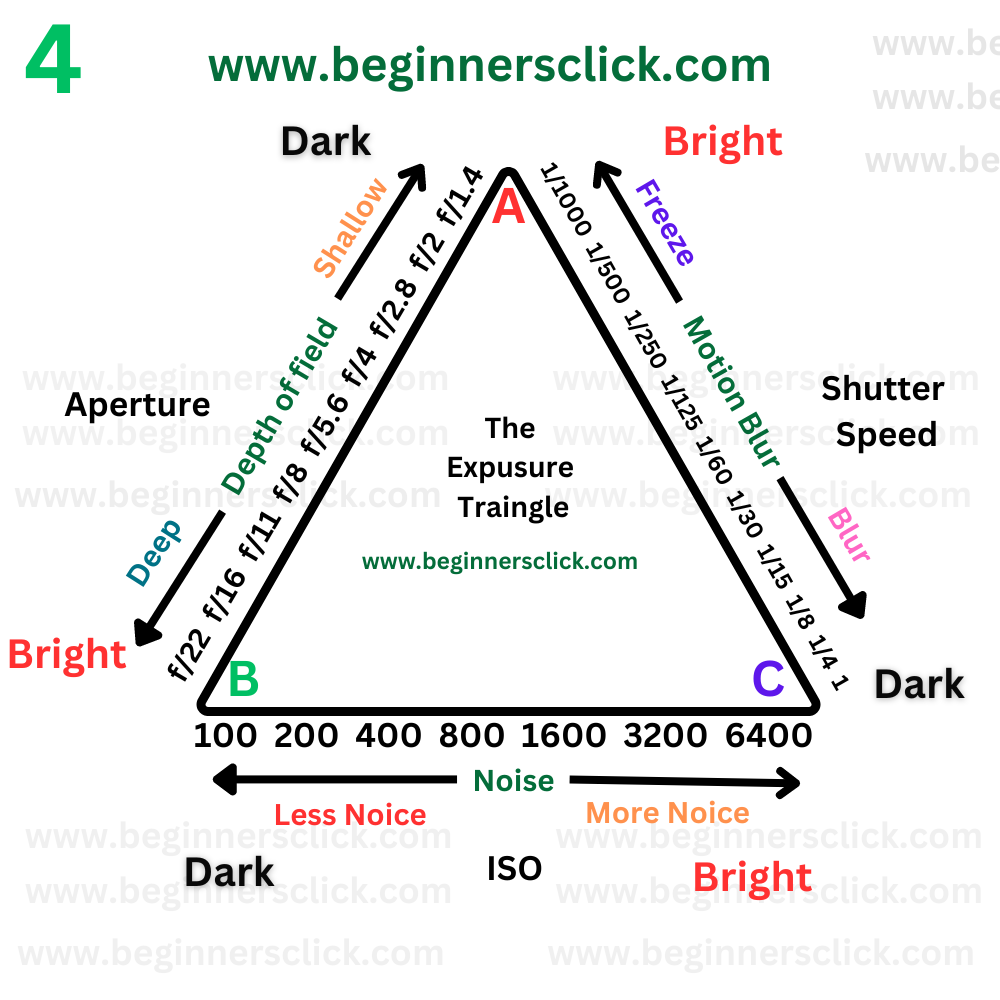
This is a crucial part of this article. So, as you read this, forget what you thought you knew before. We’re going to learn from scratch. We’ll discuss it step by step. We’ll try to learn through various pictures. Let’s get started. Let’s look at the pictures first – Picture 1 and Picture 2.
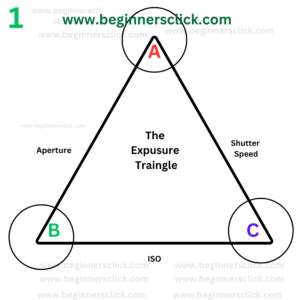
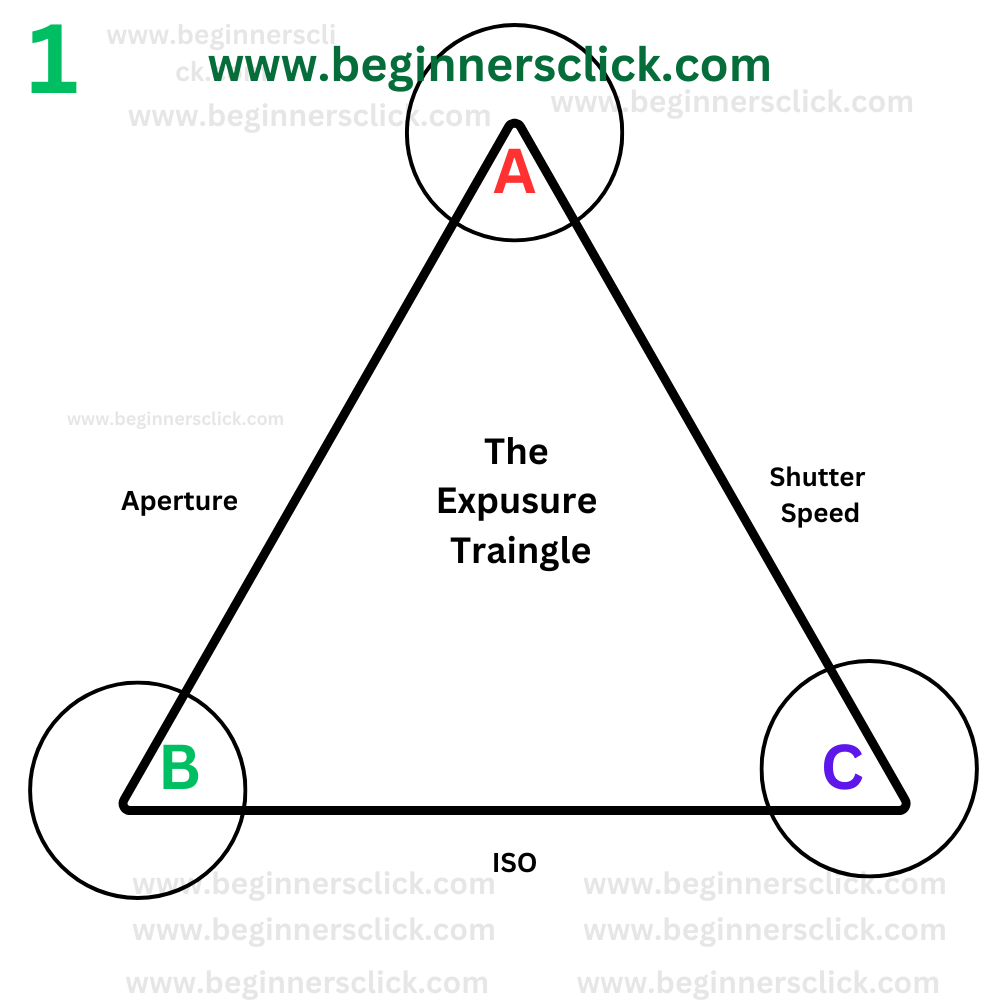
In Figure 1, we have marked three points: A, B, and C.
Point A to B = Aperture
Point B to C = ISO
Point A to C = Shutter Speed
These three points together form the Exposure Triangle.
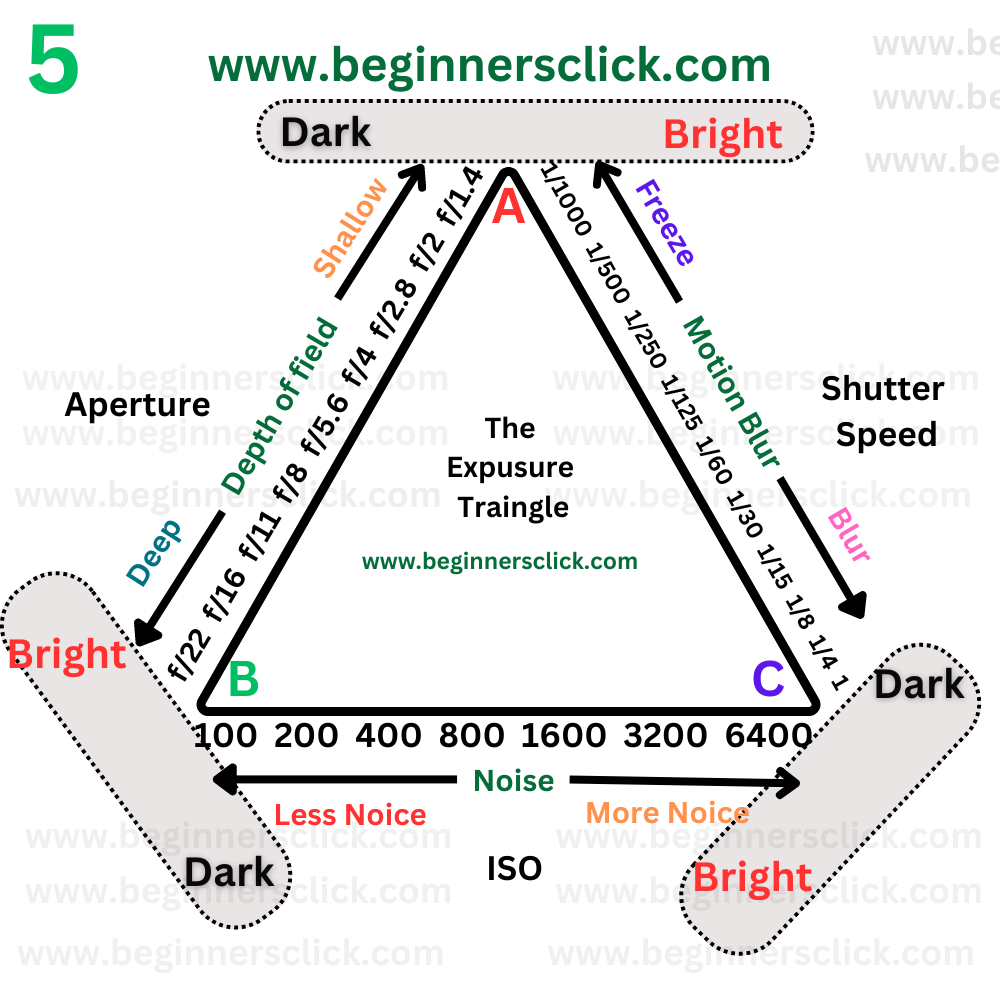
Now, let’s take a closer look at Figure 2.

Point A to B:
Notice that at Point B, the aperture (represented by the ‘f’ value) is f/22, which indicates a small opening. This might seem counterintuitive, as you might expect a smaller ‘f’ number to correspond to a larger aperture. However, in this case, f/22 represents a smaller aperture opening.
Understanding the ‘f’ Value: It’s important to remember that the ‘f’ value in photography is inversely proportional to the size of the aperture. This means that a higher ‘f’ number (like f/22) indicates a smaller aperture, while a lower ‘f’ number (like f/1.4) indicates a larger aperture.
Impact on Light:
The size of the aperture directly affects the amount of light that enters the camera sensor. A larger aperture (smaller ‘f’ number) allows more light to enter, resulting in a brighter image. Conversely, a smaller aperture (larger ‘f’ number) allows less light to enter, resulting in a darker image.
Key Takeaway:
Smaller ‘f’ number (e.g., f/1.4) = Larger aperture = More light
Larger ‘f’ number (e.g., f/22) = Smaller aperture = Less light
By understanding this relationship, you can effectively control the exposure of your photographs and achieve the desired lighting effect.
Point B to C:
Notice that Point B has a value of 100, while Point C has a value of 6400. This significant difference represents a change in ISO sensitivity.
Understanding ISO:
ISO is a measure of a camera sensor’s sensitivity to light. A higher ISO number (like 6400) indicates a higher sensitivity, meaning the sensor requires less light to produce a properly exposed image. Conversely, a lower ISO number (like 100) indicates a lower sensitivity, meaning the sensor requires more light to produce a properly exposed image.
Impact on Shutter Speed:
From Point A to C, the choice of ISO directly affects the shutter speed required for proper exposure. When using a higher ISO, you can use a faster shutter speed, even in low-light conditions. This is because the sensor is more sensitive to light, allowing it to capture a well-exposed image in a shorter amount of time. Conversely, when using a lower ISO, you need to use a slower shutter speed to allow more light to reach the sensor and produce a properly exposed image
Key Takeaway:
- Higher ISO = Higher sensitivity = Faster shutter speed
- Lower ISO = Lower sensitivity = Slower shutter speed
By understanding this relationship, you can balance ISO and shutter speed to achieve the desired exposure and creative effects in your photographs.
Understanding Exposure Triangle and Its Effects: Depth of Field, Motion Blur, and Noise
Understanding the Exposure Triangle: My Journey and How It Transformed My Photography
When I first picked up a camera, the Exposure Triangle seemed like a puzzle I couldn’t quite solve. I had heard of aperture, shutter speed, and ISO, but I struggled to understand how they all worked together. I would set one, then the others would go out of whack, and my photos weren’t turning out as I had imagined.
As I spent more time experimenting, I realized that these three settings don’t just control how much light hits the sensor. They also play a crucial role in shaping the mood of the image, adding depth, emotion, and storytelling. Understanding this balance unlocked a whole new level of creativity for me.
Visualizing the Exposure Triangle: A Simple Breakdown
Imagine the Exposure Triangle as a shape with three points:
- Point A to B: Depth of Field (DoF)
- Point A to C: Motion Blur
- Point B to C: Noise
Now, let’s explore how these three elements come into play and how they work together in your photos.
Depth of Field (DoF): Shallow vs. Deep Focus
At first, I used to think the depth of field only referred to how much of the image was in focus. But there’s more to it than that!
- Shallow Depth of Field: When I used a wide aperture (like f/1.8), I saw a blurred background and a sharp subject. This effect, commonly used in portraits, helped to isolate the subject and make it stand out. The background just melted away, leaving the subject as the focal point of the story.
- Deep Depth of Field: When I started experimenting with f/16 or f/22, I noticed that more of the scene came into focus — from the foreground to the background. This is perfect for landscape photography where you want the entire scene to be sharp, allowing the viewer to immerse themselves in the entire picture.
Key Takeaway:
- Shallow DoF isolates your subject, making it stand out (great for portraits).
- Deep DoF keeps everything in focus, creating a sense of space and detail (ideal for landscapes).
Motion Blur: Freezing Action vs. Creating Movement
Motion blur is where things started to get really fun for me. I remember the first time I tried freezing motion at a sports event. The result was a blurry mess — I quickly learned that shutter speed is the secret.
- Fast Shutter Speed: When I used a fast shutter speed like 1/1000, I could freeze the action — capturing a runner mid-stride without any motion blur. The image was sharp, but sometimes a little too rigid, lacking that sense of movement.
- Slow Shutter Speed: Then, I experimented with slower shutter speeds (like 1/30), and I noticed something amazing. The movement was no longer frozen — instead, it blurred artistically, creating a feeling of motion. Think light trails from cars or waterfalls with a silky smooth look.
Key Takeaway:
- Fast Shutter Speed: Freezes motion, making action sharp and clear.
- Slow Shutter Speed: Creates blur, conveying a sense of movement and artistic flow.
- Point A: High shutter speed, frozen image, darker
- Moving from A to C: Decreasing shutter speed, blurry image, brighter
Noise: The Grainy Truth About ISO
Finally, ISO. At first, I didn’t think much about it. I’d crank up the ISO to get a brighter shot, not realizing it could introduce unwanted noise.
- Low ISO (e.g., 100): I learned that a low ISO setting is best in well-lit conditions, providing clean and sharp images without any grain.
- High ISO (e.g., 1600): However, when shooting in low light, I had to increase the ISO. The result was a brighter image, but there was often noise (grain) that I had to deal with in post-processing. It’s a balancing act: higher ISO = more light sensitivity, but also more noise.
Key Takeaway:
- Low ISO = Cleaner, sharper images in bright conditions.
- High ISO = Better in low-light situations, but it introduces noise.
- Point B: Low light, no visible noise
- Moving from B to C: Increasing light, increasing noise
Simplifying the Concepts:
Depth of Field:
Controls how much of the scene is in focus. A shallow depth of field blurs the background, while a deep depth of field keeps both the foreground and background in focus.
Motion Blur:
Controls how much movement is blurred in the image. A fast shutter speed freezes motion, while a slow shutter speed creates motion blur.
Noise:
Refers to unwanted grain or speckles in the image, caused by high ISO settings or low light conditions.
Practical Applications: How to Use Each Element for Creative Effects
- Depth of Field: For portraits, use a shallow DoF (wide aperture) to isolate your subject from the background. For landscapes, use a deeper DoF (small aperture) to keep everything in focus and create a more immersive experience.
- Motion Blur: Use a fast shutter speed to freeze action, like in sports or wildlife photography. A slow shutter speed is great for artistic effects, such as light trails or silky smooth water.
- Noise: Keep your ISO as low as possible for cleaner images, but don’t hesitate to increase it when shooting in low-light situations.
Remember: The Exposure Triangle is a balance between aperture, shutter speed, and ISO. Adjusting one setting will affect the others, so it’s important to understand how they work together to achieve the desired photographic effect.
Bringing It All Together: Mastering the Exposure Triangle
Each of these settings — aperture, shutter speed, and ISO — works together to control light, motion, and sharpness in your photos. By understanding how to manipulate the Exposure Triangle, you can choose the right settings for every shot and create the photos you’ve always envisioned.
With practice and experimentation, you’ll gain the confidence to adjust these settings creatively to capture beautifully exposed and expressive images.
The Key to Becoming a Master of Light
Mastering the Exposure Triangle isn’t just about knowing what each setting does — it’s about understanding how they interact to create the effect you want. So, next time you’re out shooting, remember: experiment, fail, learn, and repeat. The more you practice, the more you’ll see how aperture, shutter speed, and ISO can help you tell your unique visual story.
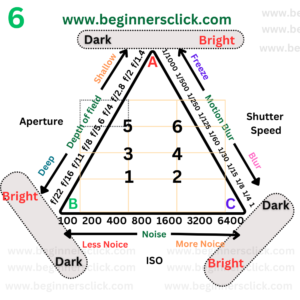
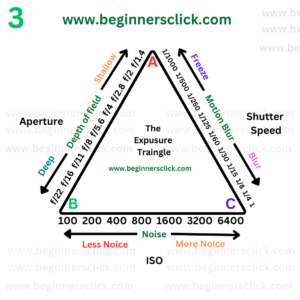
Figure 6: Demystifying the Exposure Triangle
In Figure 6, we’ll explore how the three fundamental elements of the Exposure Triangle – Depth of Field, Motion Blur, and Noise – interact to create different photographic effects.
When I first picked up a camera, the Exposure Triangle seemed like a confusing mess of numbers and settings. I mean, how could aperture, shutter speed, and ISO — these three seemingly unrelated things — come together to produce the perfect image?
But as I spent more time with my camera, I started to realize how each of these elements — the aperture (depth of field), shutter speed (motion blur), and ISO (noise) — all played their part in creating a photograph that wasn’t just well-lit but also told a story, evoked emotion, and captured the essence of the moment.
Understanding the Exposure Triangle: A Simple Breakdown
Let me paint a picture for you.
Imagine a triangle, and each of the three sides represents one of the key settings:
- Point A to B (Aperture) – Controls Depth of Field (DoF). It’s how much of the scene is in focus.
- Point A to C (Shutter Speed) – Controls Motion Blur. It determines whether you freeze or blur motion.
- Point B to C (ISO) – Controls Noise. It affects how sensitive your camera is to light.
Here’s the kicker: adjusting one of these settings doesn’t just affect that single element. It influences the other two, too. Balance is key, and understanding this triangle can give you the power to create any kind of image you want.
Exploring the Triangle with Figure 6: See It in Action
Take a look at Figure 6. You’ll see a clear representation of the Exposure Triangle, showing how each element plays a role in your exposure and creative choices.
Depth of Field (DOF) – The Magic of Aperture
Depth of field is the part of your image that’s in focus, and it’s largely influenced by your aperture setting. The aperture controls the size of the opening in your lens. A wide aperture (f/1.4 or f/2.8) creates a shallow depth of field, where only a small part of the scene is sharp and the rest is blurred. Perfect for portraits or isolating subjects.
On the flip side, a narrow aperture (f/16 or f/22) creates a deeper depth of field, where more of the scene is in focus. This is ideal for landscapes, where you want to keep everything sharp — from the nearest flowers to the farthest mountains.
Motion Blur – The Power of Shutter Speed
Shutter speed is how long the camera’s shutter remains open to let light in. Fast shutter speeds (like 1/1000 sec) freeze motion, making action shots crisp and clear. Perfect for sports or capturing moving objects.
In contrast, slow shutter speeds (like 1/30 sec) let more light in and create motion blur, adding a sense of movement to your photos. This is especially useful for artistic effects, such as capturing light trails or smooth, flowing waterfalls.
ISO – The Sensitivity to Light
ISO controls the camera sensor’s sensitivity to light. A low ISO (e.g., 100 or 200) works best in bright conditions, giving you crisp, clean images. But when the light fades and you want to avoid blurry shots, you’ll need to increase the ISO. Just keep in mind, the higher the ISO, the more noise (graininess) can creep into your shots.
A high ISO (e.g., 1600 or 3200) is a lifesaver in low-light conditions, but it comes at the cost of noise. It’s a balancing act — you want enough light to capture the moment, but without introducing too much grain.
Balancing the Triangle – A Simple Equation
To make things simpler, let’s look at how these elements balance each other. In Figure 6:
- Point A to B: Depth of Field — As the aperture narrows (moving from f/1.4 to f/22), your depth of field increases, but less light enters. The image gets darker.
- Point A to C: Motion Blur — With fast shutter speeds (1/1000 sec), motion is frozen, but the image may get darker. Slower shutter speeds let more light in but blur movement.
- Point B to C: Noise — Low ISO (100) keeps your image clean and crisp. But when you increase the ISO, you need a faster shutter speed to balance the exposure, which can introduce noise.
Exploring Variations:
By adjusting the aperture, shutter speed, and ISO settings, you can create a wide range of photographic effects. Experiment with different combinations to achieve the desired outcome.
I hope you found this explanation of this complex topic easy to understand.
Here are some additional tips for mastering the exposure triangle:
Taking Control: Experimenting with the Triangle
The best way to master the exposure triangle is by experimenting. Here are some tips to get you started:
- Start in Aperture Priority Mode (Av or A): This lets you control aperture (depth of field), while the camera adjusts the shutter speed for a proper exposure.
- Try Shutter Priority Mode (Tv or S): Here, you control shutter speed for freezing motion or creating motion blur, and the camera adjusts the aperture for the exposure.
- Switch to Manual Mode (M): This gives you full control over all three settings. Once you’re comfortable with how aperture, shutter speed, and ISO work together, manual mode is where you can fully explore your creative options.
Beyond the Basics: Advanced Considerations
As you progress, here are some additional factors to consider:
Exposure Meter:
Your camera has a built-in exposure meter that indicates whether your image will be under- or overexposed. Use it as a guide, but don’t be afraid to adjust settings based on your desired outcome.
Light Metering Modes:
Most cameras offer different light metering modes, each suited for specific situations. Experiment with them to ensure accurate exposure, especially in tricky lighting conditions.
White Balance:
This setting affects the color temperature of your image. Understanding white balance will help you capture natural-looking colors under different lighting scenarios.
The Key to Photographic Freedom
Let’s Be Honest — It’s a Bit Tricky at First, Isn’t It?
When I first heard terms like ISO, aperture, and shutter speed, they sounded like something from a science textbook. Too technical. Too intimidating. But here’s the truth: once you get to know them, they become less like strangers and more like teammates—each one playing a role in helping you create the photo you *see* in your head.
The exposure triangle isn’t just theory — it’s the foundation of creative control in photography. It’s how you turn a bland snapshot into an intentional image. Learning it means you’re no longer leaving your shot up to chance. You’re telling your camera: “I got this.”
So What Should You Do Next?
Simple: get your hands dirty.
Open your camera. Switch it to manual or semi-manual mode. Start experimenting.
Here are a few fun challenges you can try today:
– Change only the ISO and see how it affects brightness and noise.
– Take two shots of the same subject — one with a wide aperture (f/1.8) and one with a narrow aperture (f/11). Watch what happens to the background.
– Use a fast shutter speed to freeze motion, then try a slow one and capture some blur. It’s magic, I promise.
The goal isn’t perfection — it’s awareness. The more you play with these three settings, the more you feel how light behaves.
A Little Secret Before You Go...
You don’t need the best camera or the most expensive gear to master light. You just need curiosity and the willingness to keep practicing. Every great photographer started here, exactly where you are now — asking questions, making mistakes, and slowly getting better.
So if you’re still unsure about something, leave a comment below.
Seriously — I read every one, and I love hearing from fellow learners.
Because mastering light isn’t a one-time thing — it’s a journey.
And you’ve already taken the first step.
Keep clicking. Keep learning. And remember: your camera is just a tool — you are the artist.
See you in the next post. 😉
Frequently Asked Questions (FAQ)
1. What is the Exposure Triangle in Photography?
The Exposure Triangle is a foundational concept in photography that consists of three key elements: Aperture, Shutter Speed, and ISO. These three factors work together to control how much light enters your camera, the type of light in your image, and the overall exposure. By adjusting these settings in harmony, you can create well-exposed photographs that match your creative vision.
2. Why is the Exposure Triangle important for beginners?
For beginners, understanding the Exposure Triangle is crucial because it gives you complete control over how your camera captures light. Mastering these settings will help you move beyond auto mode and allow you to create photographs exactly the way you envision them. Learning how these three elements work together helps you balance brightness, focus, and motion in your images.
3. How do Aperture, Shutter Speed, and ISO affect my photos?
- Aperture controls how much light enters your camera and also determines how much of your image is in focus (depth of field). A wide aperture (like f/2.8) creates a shallow depth of field with a blurred background, while a narrow aperture (like f/16) keeps more of the scene in focus.
- Shutter Speed controls the amount of time the camera’s shutter is open, allowing light to hit the sensor. Faster shutter speeds (like 1/1000) freeze motion, while slower shutter speeds (like 1/30) capture motion blur.
- ISO determines your camera’s sensitivity to light. A low ISO (like 100) produces clean images in bright light, while a high ISO (like 3200) allows for brighter photos in low-light situations but may introduce noise or grain.
4. What is the best Aperture for Portrait Photography?
For portrait photography, a wide aperture (low f-number like f/1.8 or f/2.8) is often preferred. A wider aperture creates a shallow depth of field, which helps isolate the subject from the background, making them stand out clearly while blurring the surroundings. This effect gives portraits a more artistic and professional look.
5. How do I choose the right Shutter Speed?
The right shutter speed depends on what you’re photographing. For moving subjects, you’ll need a faster shutter speed (like 1/500 or faster) to freeze the motion. For long exposure shots (such as capturing a waterfall or light trails), you’ll need a slower shutter speed (like 1/30 or longer). Keep in mind that slower shutter speeds require a stable camera (e.g., tripod) to avoid camera shake.
6. How does ISO affect my image quality?
ISO affects both brightness and image noise. A low ISO (like 100 or 200) is ideal for bright environments and ensures your photos are crisp and clean. Higher ISOs (like 800 or 1600) are useful in low-light conditions but can introduce grain or noise into your images. Always try to use the lowest ISO possible for your situation to maintain the highest image quality.
7. Can I use the Exposure Triangle in all types of photography?
Absolutely! The Exposure Triangle applies to every type of photography, whether you’re shooting portraits, landscapes, macro, or action shots. Understanding how to balance aperture, shutter speed, and ISO will allow you to adjust your settings based on the unique needs of the scene and the effect you want to create.
8. What happens if I only adjust one side of the Exposure Triangle?
Adjusting just one side of the Exposure Triangle (aperture, shutter speed, or ISO) will affect the overall exposure, but you’ll likely need to adjust the other two sides as well to maintain a balanced image. For example:
- Increasing the aperture size (lower f-number) will allow more light in, but you may need to lower the ISO or increase the shutter speed to compensate for the extra light.
- If you change the shutter speed (e.g., slow it down), you may need to adjust the aperture or ISO to avoid underexposing or overexposing the image.
9. How can I practice using the Exposure Triangle?
The best way to practice is through experimentation. Start by setting your camera to manual mode, and then adjust each setting:
- Aperture: Experiment with different f-stops to see how it affects your depth of field.
- Shutter Speed: Try freezing fast action or capturing motion blur.
- ISO: Test different ISO settings in various lighting conditions to see how it affects exposure and image quality.
10. What is the best way to learn the Exposure Triangle?
The key to mastering the Exposure Triangle is practice. Take your camera out in various lighting conditions and experiment with different combinations of aperture, shutter speed, and ISO. Over time, you’ll start to see how each element affects your photos and develop an intuitive understanding of exposure.

As I web-site possessor I believe the content matter here is rattling magnificent , appreciate it for your hard work. You should keep it up forever! Good Luck.
Thank you so much for your encouraging words! I truly appreciate your support and motivation. I’ll definitely keep creating more valuable content. Stay with me!
Some genuinely nice stuff on this internet site, I enjoy it.
Thank you so much! I’m really happy to hear that you’re enjoying the content. Your support truly inspires me to keep creating more. Stay connected!
Hello! Quick question that’s totally off topic. Do you know how to make your site mobile friendly? My site looks weird when viewing from my iphone 4. I’m trying to find a template or plugin that might be able to resolve this issue. If you have any recommendations, please share. With thanks!
Hi! Thanks for reaching out. To be honest, I’m not an expert on this, but I’m currently using the Astro WordPress theme, which is responsive and seems to work well on most devices. You might want to check if your theme supports mobile responsiveness or consider switching to a theme like Astro. Also, some plugins like “WPtouch” or “Jetpack” might help improve mobile compatibility. Hope this helps a bit!
Hi there! This post couldn’t be written any better! Reading through this post reminds me of my previous room mate! He always kept talking about this. I will forward this article to him. Pretty sure he will have a good read. Thank you for sharing!
That’s wonderful to hear! Thank you for your kind words and for sharing the post with your friend. I hope he enjoys it as much as you did. Appreciate your support!
Good post. I learn something more difficult on totally different blogs everyday. It is going to all the time be stimulating to read content material from other writers and follow a bit of something from their store. I’d want to use some with the content material on my blog whether you don’t mind. Natually I’ll give you a hyperlink in your internet blog. Thanks for sharing.
Thank you so much for your thoughtful comment! I’m glad you found the post helpful and inspiring. And yes, feel free to use a portion of the content on your blog as long as proper credit is given with a link back to the original post. I truly appreciate your respect for the work. Looking forward to seeing your blog as well!
Thank you for the auspicious writeup. It in fact was once a leisure account it. Glance complicated to more added agreeable from you! However, how can we communicate?
Thank you so much for your kind feedback! I truly appreciate it and I’m glad you enjoyed the write-up. I’d be happy to stay in touch — you can reach me anytime via the contact page on my website or leave a comment. Looking forward to connecting!
email- info@beginnersclick.com
Thanks for the sensible critique. Me and my neighbor were just preparing to do a little research about this. We got a grab a book from our area library but I think I learned more clear from this post. I am very glad to see such excellent info being shared freely out there.
Thanks a lot for your kind words! I always try to share information in a simple and practical way so that it’s easy to understand. Glad to know it helped you more than the book!
If you’re planning to start a blog or need help setting up your own website, I’d be happy to guide you—or even create one for you if you’d like.
Howdy very nice site!! Guy .. Excellent .. Amazing .. I will bookmark your web site and take the feeds alsoKI am glad to search out so many helpful information here within the put up, we’d like develop extra techniques in this regard, thank you for sharing. . . . . .
Thanks a lot for your kind words! I’m happy to know you found the information useful. I’ll keep sharing more resources and techniques here. Stay connected!
I really appreciate this post. I have been looking everywhere for this! Thank goodness I found it on Bing. You have made my day! Thank you again
Thank you so much! 😊 I’m really glad you found the post helpful and that it made your day. Your kind words mean a lot, and I’ll keep sharing more useful content like this!
When I initially commented I clicked the “Notify me when new comments are added” checkbox and now each time a comment is added I get three emails with the same comment. Is there any way you can remove people from that service? Thanks!
Thanks for letting me know! That sounds frustrating, and I’m really sorry for the inconvenience. The email notification system sometimes acts up like that. I’ll look into fixing it so it doesn’t send duplicates, and if needed, I can manually remove your email from the notification list. Thanks for your patience!
This site can be a walk-by way of for the entire information you wanted about this and didn’t know who to ask. Glimpse here, and also you’ll positively discover it.
So glad to hear you found what you were looking for! That’s exactly why I started this site.
Great V I should certainly pronounce, impressed with your site. I had no trouble navigating through all the tabs and related information ended up being truly simple to do to access. I recently found what I hoped for before you know it in the least. Reasonably unusual. Is likely to appreciate it for those who add forums or anything, website theme . a tones way for your client to communicate. Nice task..
Thank you so much for your feedback! I’m glad you found the site easy to navigate and helpful. I’ll definitely consider adding a forum or community section in the future. Your support is much appreciated!
This site is mostly a stroll-via for all of the information you wanted about this and didn’t know who to ask. Glimpse right here, and also you’ll positively discover it.
I’m really glad you found the information helpful! Thanks a lot for stopping by and taking the time to read.
It is really a nice and helpful piece of info. I am glad that you shared this helpful information with us. Please keep us up to date like this. Thanks for sharing.
Thank you so much! I’m really glad you found the information helpful. I’ll definitely keep sharing more updates like this — stay tuned!
Good – I should definitely pronounce, impressed with your web site. I had no trouble navigating through all tabs as well as related info ended up being truly simple to do to access. I recently found what I hoped for before you know it in the least. Quite unusual. Is likely to appreciate it for those who add forums or anything, web site theme . a tones way for your client to communicate. Nice task.
Hi! Thank you so much for your wonderful and detailed feedback 😊. We’re really glad to know that you found the website easy to navigate and the information accessible — that’s exactly what we aim for!
We truly appreciate your suggestion about adding forums or more interactive features; that’s a great idea and something we’ll definitely consider for the future. Thanks again for visiting and sharing your thoughts!