Mastering Photography with a Tripod: A Beginner's Guide to Sharper Images & Creative Techniques
As aspiring photographers, you are probably familiar with tripods. Tripods are an essential part of any type of photography.
When I first started photography, I noticed that my photos were shaky. I couldn’t fix it at the time, and I didn’t know why my photos were blurry. After a few days, I realized it was because of my hand stability. My hands were not steady at certain shutter speeds, and my photos were shaky when my shutter speed was slower. That’s when I realized I needed a tripod for stability.
Tripods allow you to utilize long exposures, effectively capturing the intricate details of landscapes. For photographers, a tripod is a highly valuable tool when aiming to capture stunning landscape images. When attempting to photograph the dynamic shapes of waterfalls or clouds, a tripod becomes especially helpful.
How it Works:
To achieve a blurred waterfall effect, a slow shutter speed is necessary. However, holding the camera by hand at such a slow speed will inevitably result in shaky images. Conversely, using a tripod ensures image stability, allowing you to capture a clear shot with the flowing water of the waterfall beautifully blurred.
Portrait Photography:
To achieve the best results in portrait photography, a tripod becomes a mandatory tool. Why? Tripods empower you to shoot in low-light conditions while eliminating camera shake, which can lead to blurry images. In low light, capturing captivating portrait shots, especially dramatic ones, becomes significantly more challenging without a tripod. You can use slower shutter speeds or increase the ISO to achieve the desired light effect. However, increasing the ISO introduces unwanted noise into your photographs. Conversely, slower shutter speeds, while ideal for low-light situations, can lead to camera shake and blurry images.
The Power of Stability:
Enter the Tripod This is precisely why a tripod becomes essential. It provides the stability needed to experiment with lighting and capture stunning portrait photographs, even in low-light conditions.
Macro Photography:
Tripods allow you to get closer to small subjects and capture sharp, blur-free images. For macro photography, we can use different types of tripods for stability. Why is a tripod needed for macro photography? It’s also a question.
Sharpness:
In macro photography, even the tiniest camera shake can cause blur due to the shallow depth of field. By stabilizing the camera on a tripod, you eliminate this risk and capture razor-sharp images.
Slow Shutter Speeds:
Macro subjects are often stationary, allowing you to use slower shutter speeds for more creative control over lighting and depth of field. A tripod is necessary to achieve sharp results at these slower speeds.
Focus Stacking:
This technique involves taking multiple photos at different focus points and combining them later for a final image with everything in focus. A tripod ensures the camera stays perfectly still during this process.
Composing and Adjustments:
A tripod frees up your hands to concentrate on framing the shot, making adjustments to lighting or your subject without moving the camera.
Astrophotography:
Tripods enable you to use long exposures, which are essential for capturing stars and planets in the sky. Generally, it is simply impossible without a tripod for astrophotography. There are many reasons.
Long Exposures:
As you mentioned, capturing faint celestial objects like stars and nebulae requires long exposure times, often exceeding several minutes. The Earth’s rotation itself causes stars to appear to move across the sky, and even the slightest camera shake during handheld shooting would result in blurry, unusable images. A tripod provides a stable platform to ensure the camera stays perfectly still throughout the exposure.
Magnification:
Astrophotography often involves using telephoto lenses or telescopes to zoom in on distant objects. This magnification amplifies even minor camera movements, making a tripod even more critical for achieving sharp results.
Precise Framing:
When photographing the night sky, precise framing is crucial. A tripod allows you to meticulously compose your shot and lock the camera in position, ensuring you capture the desired celestial objects within the frame.
Multiple Exposures:
Many astrophotography techniques involve stacking multiple images to improve the signal-to-noise ratio or create panoramic views of the night sky. A tripod guarantees consistent positioning for each image in the sequence, allowing them to be seamlessly combined later.
In essence, a tripod is the foundation for capturing clear, detailed astrophotography images. It eliminates camera shake, facilitates precise framing, and allows for the long exposures necessary to reveal the hidden beauty of the universe.
Wildlife Photography
Tripods allow you to use longer lenses and shoot animals from a distance, which is less likely to scare or disturb them. Longer lenses mean lots of weight, which can be difficult to carry for a long time. Why is a tripod important for wildlife photography? Actually, I am not a wildlife photographer, but I think some issues should be considered when using a tripod for wildlife photography.
Sharpness:
Wildlife photography often involves low-light situations or using long telephoto lenses, both of which can lead to camera shake and blurry images if handheld. A tripod provides a stable platform, ensuring crisp, clear photos of animals, even at slower shutter speeds.
Long Lenses & Stability:
Large telephoto lenses are heavy and bulky, making handheld shooting tiring and causing camera shake. A tripod takes the weight off your arms, allowing you to hold the camera steady for long periods, perfect for capturing those fleeting moments.
Composure & Patience:
Wildlife photography often requires patience and waiting for the perfect shot. A tripod frees up your hands and allows you to meticulously compose your image, focus on the animal’s behavior, and react quickly when the opportunity arises.
Improved Framing:
Tripods enable precise adjustments to your composition, ensuring the animal is perfectly positioned within the frame. You can focus on different elements like the background or foreground to create a more compelling image.
Versatility:
Tripods provide a stable base for various wildlife photography techniques. Whether you’re capturing slow-motion video of an animal in motion or using panning techniques to track a moving subject, a tripod ensures smooth, professional results.
While using long lenses from a distance to minimize disturbance is a benefit, the tripod’s overall contribution goes far beyond that. It enhances image quality, improves your shooting experience, and allows you to capture stunning wildlife moments you might miss otherwise.
Common Advantages of Using a Tripod:
Tripods offer several benefits that make them a valuable tool for photographers of all levels and genres. Here are some of the key advantages:
Stability:
Tripods provide a stable base for your camera, minimizing camera shake that can lead to blurry images. This is particularly important for low-light photography, long exposures, and telephoto lens usage.
Long Exposures:
Tripods allow you to use long exposure times, which are essential for capturing low-light scenes, motion blur effects like waterfalls or clouds, and light trails from moving vehicles or stars.
Precise Framing:
With a tripod, you have more time and freedom to carefully frame your shot and achieve the perfect composition. You can adjust the camera’s position and angle precisely, ensuring that all elements of the scene are arranged harmoniously.
Versatility:
Tripods can be used for various photography genres, including landscape, portrait, wildlife, macro, astrophotography, and even videography. Their versatility makes them a worthwhile investment for photographers of all skill levels.
Improved Ergonomics:
Tripods can help reduce strain and fatigue, especially when using heavier cameras or telephoto lenses. By supporting the camera’s weight, tripods allow you to shoot for longer periods without discomfort.
Enhances Creativity:
Tripods can open up new creative possibilities by enabling you to experiment with different shooting techniques, such as slow shutter speeds, multiple exposures, and focus stacking.
Overall, tripods are essential tools for photographers seeking to capture sharp, well-composed images in a variety of situations. Their ability to stabilize the camera, facilitate long exposures, and enhance framing makes them a valuable asset for photographers of all levels.
Factors to Consider When Buying a Tripod:
Choosing the right tripod is crucial for photographers of all levels. The type of tripod you need will depend on your specific needs and shooting style. Here are some key factors to consider:
Height:
Ensure the tripod is tall enough for your camera and lens setup. If you use long lenses, you’ll need a tripod that allows you to shoot at full height. For those who primarily use smaller lenses, a lightweight and extendable tripod might be a better choice. Remember, heavier lenses can be supported by lighter tripods.
Weight:
Make sure the tripod can support the weight of your camera and lens setup. For heavy cameras and lenses, you’ll need a sturdy tripod. However, the first thing to consider when buying a tripod is its weight. Many people think that a lightweight tripod is better. In fact, the truth is that you should buy a tripod based on its weight; otherwise, the tripod will shake in the wind, and the image will also be shaky.
I didn’t know this at first. I bought a lightweight tripod without knowing it, and now that I’ve bought it, I can’t throw it away. So after much thought, I came up with a trick. I tied bricks to the lower bottom of the tripod to increase its weight, and since then I haven’t had any more shaking on my tripod.
As you can see, I emphasizes the importance of choosing a tripod that can support the weight of your camera and lens setup. They also share their personal experience of buying a lightweight tripod and having to find ways to add weight to it in order to prevent it from shaking in the wind.
Stability:
Ensure the tripod is stable and vibration-free. This will prevent your images from appearing blurry. Generally, the heavier the tripod, the more stable it will be. However, if there are defects in the tripod legs, no matter how heavy it is, the image quality will be compromised.
Features:
Some tripods have quick-release plates, bubble levels, and hooks for hanging your camera bag. Decide which features you need and choose a tripod accordingly.
Budget:
Tripod prices can vary widely. Set a budget and find a tripod that fits within it. Check prices on different sites before purchasing the product according to your budget.
As you can see, I cover three additional factors to consider when buying a tripod: stability, features, and budget. basically I emphasize the importance of choosing a stable tripod to prevent blurry images and suggest considering features like quick-release plates and hooks based on individual needs. Finally, I advise setting a budget and checking prices before making a purchase.
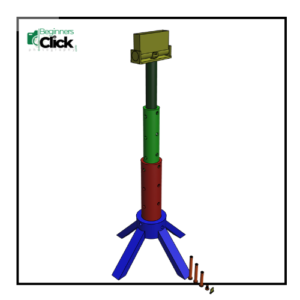
The Tripod Explained: A Complete Breakdown of Parts
A tripod is an essential tool for photographers and videographers, providing stability and support for your camera. It consists of several key parts that work together to achieve this function. Let’s break down the main components:
Legs:
The legs are the foundation of the tripod, providing the base of support. They can be made of various materials like aluminum, carbon fiber, or wood, each offering different weight, strength, and portability characteristics.
Legs typically have multiple sections extending and retracting to adjust the tripod’s height.
Each leg section has locking mechanisms to secure it at the desired length.
Some tripods offer features like independent leg spread for uneven terrain and spiked feet for added stability on soft ground.
Center Column:
The center column is a vertical pole that runs through the center of the legs and provides additional height adjustment.
It can be raised and lowered using a locking mechanism.
Some center columns are reversible, allowing you to shoot from a low angle.
You can also replace the center column with other accessories like a camera bracket for specialized uses.
Tripod Head:
The tripod head is where you attach your camera. It allows you to tilt, pan, and swivel your camera for precise framing and composition.
There are various types of tripod heads, each with its own advantages and disadvantages:
Ball Head: Offers smooth, 360-degree movement for quick adjustments.
Pan-Tilt Head: Provides independent control of pan and tilt for precise positioning.
3-Way Head: Similar to a pan-tilt head but with a third axis for additional control.
Fluid Head: Designed for smooth, controlled movements, ideal for video recording.
Quick Release Plate:
This plate attaches to the bottom of your camera and allows for quick and easy mounting and removal from the tripod head.
Most quick release plates use a standard screw size (1/4″ or 3/8″) to ensure compatibility with various cameras and heads.
Some tripods come with their own proprietary quick release plates, while others use a universal Arca-Swiss type.
Additional Features:
Some tripods may have additional features like:
Bubble Level: Helps you ensure the tripod is level for straight horizons.
Hook: Allows you to hang a weight from the center column for increased stability in windy conditions.
Carrying Case: Protects the tripod during transport and storage.
Additional Tips:
Try it before you buy it:
Before purchasing a tripod, try it out in person if possible. This will allow you to assess its stability, ease of use, and overall feel.
Invest in quality:
If you plan to use a tripod regularly, consider investing in a high-quality model. A well-made tripod will provide better stability, durability, and longevity.
Protect your investment:
Purchase a tripod case or bag to protect your tripod during transport and storage. This will help prevent damage and keep your tripod in good condition.
Popular Tripod Brands:
Manfrotto
Gitzo
Benro
Slik
Velbon
By choosing the right tripod for your needs, you can improve the quality of your photographs and achieve more stable, professional results.
Conclusion:
Incorporating a tripod into your photography arsenal is a game-changer. It empowers you to capture stunningly sharp images, experiment with creative techniques, and achieve professional-looking results across various genres. By understanding the advantages of tripods and following the tips in this guide, you’ll be well on your way to mastering photography and elevating your visual storytelling to new heights.
Hey there! This post could not be written any better! Reading this post reminds me of my previous room mate! He always kept chatting about this. I will forward this post to him. Fairly certain he will have a good read. Thank you for sharing!
I do not even know how I stopped up here, but I thought this publish used to be great. I do not realize who you might be but certainly you’re going to a well-known blogger in case you are not already 😉 Cheers!
Thank you so much for your kind words and encouragement! I’m really glad you found the post great. I truly appreciate your support—it means a lot. Hope to see you around more often!
Nice post. I was checking constantly this blog and I am impressed! Very useful info particularly the final section 🙂 I take care of such information much. I was seeking this certain information for a very lengthy time. Thanks and good luck.
Thank you so much for your kind words! I’m really glad to know that you found the post helpful—especially the final part. Your support means a lot, and I’ll keep working to share more valuable content. Stay connected!
Hey! I know this is somewhat off topic but I was wondering which blog platform are you using for this website? I’m getting sick and tired of WordPress because I’ve had issues with hackers and I’m looking at options for another platform. I would be fantastic if you could point me in the direction of a good platform.
Sure! Thanks for your comment. I’m currently using WordPress with the Astro theme. I’m not an expert, but I’ve found it flexible and easy to manage so far. For added security, I recommend using some essential plugins like Wordfence or Sucuri.
If you’re looking for alternatives, you could try Ghost (minimal and fast), or Wix/Webflow (more visual and beginner-friendly). Let me know if you want more details!
I would like to thnkx for the efforts you have put in writing this blog. I am hoping the same high-grade blog post from you in the upcoming as well. In fact your creative writing abilities has inspired me to get my own blog now. Really the blogging is spreading its wings quickly. Your write up is a good example of it.
Thank you so much for your kind and encouraging words! I’m truly honored that my writing inspired you to start your own blog — that means a lot to me. Blogging is indeed a powerful way to share thoughts and connect with others. Wishing you the very best in your blogging journey! If you ever need tips or support, feel free to reach out.
I enjoy you because of all of your effort on this web site. My mother takes pleasure in engaging in investigations and it’s obvious why. I notice all about the dynamic manner you create vital guidelines via your website and as well as foster response from people on that idea plus our own child is in fact becoming educated a lot. Take advantage of the remaining portion of the new year. Your performing a brilliant job.
Thank you so much for such a heartfelt and thoughtful message. It truly means a lot to know that my content is helping your family learn and grow. I’m honored that your mother and child both find value here. Wishing you and your loved ones a joyful and fulfilling year ahead. Your encouragement inspires me to keep doing my best — thank you again!
Great post. I was checking continuously this blog and I am impressed! Extremely useful information particularly the last part 🙂 I care for such information much. I was looking for this particular info for a very long time. Thank you and best of luck.
Thank you so much for your kind words! 😊 I’m really happy to hear that you found the information helpful — especially the last part. Stay tuned for more posts, and feel free to reach out if there’s anything else you’d like to read about. Best of luck to you too! 🌟
Hi there! I know this is kinda off topic but I was wondering if you knew where I could get a captcha plugin for my comment form? I’m using the same blog platform as yours and I’m having difficulty finding one? Thanks a lot!
Hi! Thanks a lot for your comment. If you’re using WordPress, you can try plugins like “Advanced Google reCAPTCHA” or “WP Armour – Honeypot Anti Spam”. Both work great for comment forms and are easy to set up. Let me know if you need help installing them. Cheers!
Very good blog! Do you have any hints for aspiring writers? I’m planning to start my own site soon but I’m a little lost on everything. Would you recommend starting with a free platform like WordPress or go for a paid option? There are so many choices out there that I’m totally confused .. Any recommendations? Thank you!
Thank you so much for your kind words! 😊
For aspiring writers, my biggest tip is: just start writing, even if it’s not perfect. As for your blog, starting with a free platform like WordPress.com or Blogger is a great idea to explore your voice and learn the basics. Once you feel confident and want more control (like custom domain, design, SEO), you can move to a paid WordPress.org site or other premium options.
If you want, I can help guide you step-by-step based on your goals. Don’t hesitate to ask!
I just could not leave your web site before suggesting that I actually enjoyed the usual info a person provide for your visitors? Is going to be back ceaselessly to inspect new posts
Thanks a lot for your kind words! It really means a lot that you found the information useful and plan to return. I’ll keep sharing more helpful posts regularly.
If you ever think about starting your own blog or website, I can also help you set it up—or even create one for you.
I’ve recently started a blog, the info you provide on this website has helped me tremendously. Thank you for all of your time & work. “Never trust anybody who says ‘trust me.’ Except just this once, of course. – from Steel Beach” by John Varley.
That’s wonderful to hear! Congratulations on starting your blog 🎉 I’m so glad the information here has been helpful for you. Wishing you lots of success on your blogging journey. And I love that quote—such a great choice!
Hmm it looks like your website ate my first comment (it was super long) so I guess I’ll just sum it up what I had written and say, I’m thoroughly enjoying your blog. I too am an aspiring blog writer but I’m still new to the whole thing. Do you have any tips for rookie blog writers? I’d certainly appreciate it.
You actually make it seem really easy together with your presentation but I to find this topic to be actually one thing which I feel I might never understand. It seems too complex and very broad for me. I’m having a look ahead on your next publish, I’ll try to get the dangle of it!
Thank you so much for your honest feedback! 🌟 I totally understand that some topics can feel overwhelming at first. My goal is always to break things down step by step, so I’m glad you’re following along. Don’t worry—you’ll get the hang of it with time, and I’ll do my best to make the next post even clearer for you!
whoah this weblog is wonderful i like studying your articles. Stay up the good paintings! You recognize, a lot of persons are searching round for this info, you could help them greatly.
This is the right blog for anyone who wants to find out about this topic. You realize so much its almost hard to argue with you (not that I actually would want…HaHa). You definitely put a new spin on a topic thats been written about for years. Great stuff, just great!
Thank you, I have just been looking for info about this subject for ages and yours is the greatest I have discovered till now. But, what about the bottom line? Are you sure about the source?
Thank you for your kind words! I always make sure to use reliable sources, but I appreciate your diligence. If you’d like, I can share the references and sources I used for this post.
Thank you for another informative site. Where else could I get that type of information written in such a perfect way? I’ve a project that I’m just now working on, and I’ve been on the look out for such info.
I’m so glad you found the information useful! Wishing you the very best with your project—hope the resources here continue to help you along the way. 🙌
Its like you read my mind! You appear to understand so much approximately this, such as you wrote the e book in it or something. I believe that you simply could do with some to force the message home a bit, however instead of that, that is wonderful blog. An excellent read. I will certainly be back.
Thank you so much for your kind words! 😊 I truly appreciate that you found the post engaging. I’ll definitely keep your suggestion in mind and try to make future blogs even more impactful. Hope to see you back again soon!
It is truly a nice and useful piece of info. I am satisfied that you simply shared this helpful information with us. Please stay us informed like this. Thank you for sharing.
Hi! Thank you so much for your kind feedback 😊. We’re really happy to know you found the information useful and appreciated the effort we put into sharing it. We’ll definitely keep posting more helpful photography content like this. Thanks again for your support and encouragement!


Hey there! This post could not be written any better! Reading this post reminds me of my previous room mate! He always kept chatting about this. I will forward this post to him. Fairly certain he will have a good read. Thank you for sharing!
I dugg some of you post as I thought they were very beneficial extremely helpful
Thank you so much! I’m really glad you found the posts helpful and beneficial. Your support truly means a lot—stay connected for more!
I do not even know how I stopped up here, but I thought this publish used to be great. I do not realize who you might be but certainly you’re going to a well-known blogger in case you are not already 😉 Cheers!
Thank you so much for your kind words and encouragement! I’m really glad you found the post great. I truly appreciate your support—it means a lot. Hope to see you around more often!
This actually answered my drawback, thank you!
You’re very welcome! I’m glad the post helped solve your problem. Feel free to reach out if you have more questions or need further help.
Nice post. I was checking constantly this blog and I am impressed! Very useful info particularly the final section 🙂 I take care of such information much. I was seeking this certain information for a very lengthy time. Thanks and good luck.
Thank you so much for your kind words! I’m really glad to know that you found the post helpful—especially the final part. Your support means a lot, and I’ll keep working to share more valuable content. Stay connected!
Hey! I know this is somewhat off topic but I was wondering which blog platform are you using for this website? I’m getting sick and tired of WordPress because I’ve had issues with hackers and I’m looking at options for another platform. I would be fantastic if you could point me in the direction of a good platform.
Sure! Thanks for your comment. I’m currently using WordPress with the Astro theme. I’m not an expert, but I’ve found it flexible and easy to manage so far. For added security, I recommend using some essential plugins like Wordfence or Sucuri.
If you’re looking for alternatives, you could try Ghost (minimal and fast), or Wix/Webflow (more visual and beginner-friendly). Let me know if you want more details!
Very interesting details you have observed, regards for posting.
Thank you so much! I truly appreciate your feedback. Glad you found it interesting!
I would like to thnkx for the efforts you have put in writing this blog. I am hoping the same high-grade blog post from you in the upcoming as well. In fact your creative writing abilities has inspired me to get my own blog now. Really the blogging is spreading its wings quickly. Your write up is a good example of it.
Thank you so much for your kind and encouraging words! I’m truly honored that my writing inspired you to start your own blog — that means a lot to me. Blogging is indeed a powerful way to share thoughts and connect with others. Wishing you the very best in your blogging journey! If you ever need tips or support, feel free to reach out.
I enjoy you because of all of your effort on this web site. My mother takes pleasure in engaging in investigations and it’s obvious why. I notice all about the dynamic manner you create vital guidelines via your website and as well as foster response from people on that idea plus our own child is in fact becoming educated a lot. Take advantage of the remaining portion of the new year. Your performing a brilliant job.
Thank you so much for such a heartfelt and thoughtful message. It truly means a lot to know that my content is helping your family learn and grow. I’m honored that your mother and child both find value here. Wishing you and your loved ones a joyful and fulfilling year ahead. Your encouragement inspires me to keep doing my best — thank you again!
Great post. I was checking continuously this blog and I am impressed! Extremely useful information particularly the last part 🙂 I care for such information much. I was looking for this particular info for a very long time. Thank you and best of luck.
Thank you so much for your kind words! 😊 I’m really happy to hear that you found the information helpful — especially the last part. Stay tuned for more posts, and feel free to reach out if there’s anything else you’d like to read about. Best of luck to you too! 🌟
Hi there! I know this is kinda off topic but I was wondering if you knew where I could get a captcha plugin for my comment form? I’m using the same blog platform as yours and I’m having difficulty finding one? Thanks a lot!
Hi! Thanks a lot for your comment. If you’re using WordPress, you can try plugins like “Advanced Google reCAPTCHA” or “WP Armour – Honeypot Anti Spam”. Both work great for comment forms and are easy to set up. Let me know if you need help installing them. Cheers!
Very good blog! Do you have any hints for aspiring writers? I’m planning to start my own site soon but I’m a little lost on everything. Would you recommend starting with a free platform like WordPress or go for a paid option? There are so many choices out there that I’m totally confused .. Any recommendations? Thank you!
Thank you so much for your kind words! 😊
For aspiring writers, my biggest tip is: just start writing, even if it’s not perfect. As for your blog, starting with a free platform like WordPress.com or Blogger is a great idea to explore your voice and learn the basics. Once you feel confident and want more control (like custom domain, design, SEO), you can move to a paid WordPress.org site or other premium options.
If you want, I can help guide you step-by-step based on your goals. Don’t hesitate to ask!
I just could not leave your web site before suggesting that I actually enjoyed the usual info a person provide for your visitors? Is going to be back ceaselessly to inspect new posts
Thanks a lot for your kind words! It really means a lot that you found the information useful and plan to return. I’ll keep sharing more helpful posts regularly.
If you ever think about starting your own blog or website, I can also help you set it up—or even create one for you.
I’ve recently started a blog, the info you provide on this website has helped me tremendously. Thank you for all of your time & work. “Never trust anybody who says ‘trust me.’ Except just this once, of course. – from Steel Beach” by John Varley.
That’s wonderful to hear! Congratulations on starting your blog 🎉 I’m so glad the information here has been helpful for you. Wishing you lots of success on your blogging journey. And I love that quote—such a great choice!
Hmm it looks like your website ate my first comment (it was super long) so I guess I’ll just sum it up what I had written and say, I’m thoroughly enjoying your blog. I too am an aspiring blog writer but I’m still new to the whole thing. Do you have any tips for rookie blog writers? I’d certainly appreciate it.
Thank you so much for your kind words! 😊 I’m really glad you’re enjoying the blog. For rookie bloggers, here are a few tips:
Start small and be consistent – publish regularly even if it’s short posts.
Focus on quality over quantity – one well-written post is better than multiple low-quality ones.
Learn basic SEO – it helps your posts reach more readers.
Engage with your audience – reply to comments and listen to feedback.
Keep learning – read other blogs, watch tutorials, and practice writing every day.
It’s a learning journey, so be patient and enjoy the process!
You actually make it seem really easy together with your presentation but I to find this topic to be actually one thing which I feel I might never understand. It seems too complex and very broad for me. I’m having a look ahead on your next publish, I’ll try to get the dangle of it!
Thank you so much for your honest feedback! 🌟 I totally understand that some topics can feel overwhelming at first. My goal is always to break things down step by step, so I’m glad you’re following along. Don’t worry—you’ll get the hang of it with time, and I’ll do my best to make the next post even clearer for you!
whoah this weblog is wonderful i like studying your articles. Stay up the good paintings! You recognize, a lot of persons are searching round for this info, you could help them greatly.
Thank you so much for your kind words! I’m glad you enjoy the articles, and I’ll definitely keep sharing more useful content.
This is the right blog for anyone who wants to find out about this topic. You realize so much its almost hard to argue with you (not that I actually would want…HaHa). You definitely put a new spin on a topic thats been written about for years. Great stuff, just great!
Thank you for your feedback! Glad you found it useful.
Thank you, I have just been looking for info about this subject for ages and yours is the greatest I have discovered till now. But, what about the bottom line? Are you sure about the source?
Thank you for your kind words! I always make sure to use reliable sources, but I appreciate your diligence. If you’d like, I can share the references and sources I used for this post.
Thank you for another informative site. Where else could I get that type of information written in such a perfect way? I’ve a project that I’m just now working on, and I’ve been on the look out for such info.
I’m so glad you found the information useful! Wishing you the very best with your project—hope the resources here continue to help you along the way. 🙌
Some truly nice and utilitarian info on this web site, as well I conceive the pattern has got great features.
Thank you! I’m glad you found the information useful and liked the design as well. Your feedback is much appreciated!
Its like you read my mind! You appear to understand so much approximately this, such as you wrote the e book in it or something. I believe that you simply could do with some to force the message home a bit, however instead of that, that is wonderful blog. An excellent read. I will certainly be back.
Thank you so much for your kind words! 😊 I truly appreciate that you found the post engaging. I’ll definitely keep your suggestion in mind and try to make future blogs even more impactful. Hope to see you back again soon!
It is truly a nice and useful piece of info. I am satisfied that you simply shared this helpful information with us. Please stay us informed like this. Thank you for sharing.
Hi! Thank you so much for your kind feedback 😊. We’re really happy to know you found the information useful and appreciated the effort we put into sharing it. We’ll definitely keep posting more helpful photography content like this. Thanks again for your support and encouragement!
Just a smiling visitor here to share the love (:, btw outstanding style.
Hi! Thank you for stopping by and sharing the love 😊. We’re thrilled that you like the style of our website! Your kind words truly brighten our day.