Table of Contents
ToggleUnderstanding Depth of Field: A Journey from Confusion to Clarity
I remember the first time I really started to pay attention to depth of field in my photos. I was out taking some landscape shots, all excited about my new camera, and I thought, “This is going to be amazing!” But when I looked at the photos later, I noticed something — some parts were sharp, but others were blurry. It wasn’t exactly what I had in mind. I was frustrated, asking myself, “Why isn’t everything as crisp as I thought it would be?”
That’s when I realized — I didn’t fully understand depth of field. It was something I’d heard of, but never really paid much attention to. It was like a mysterious concept I thought I could ignore. And boy, was I wrong!
Learning Through Trial and Error
So, I started experimenting. I made mistakes — a lot of them. There were photos where the background was too sharp, others where it was too blurry, and a few where nothing made sense at all. But each mistake taught me something new. Slowly, I started to realize that depth of field is not just about how much is in focus, it’s about what story you want your photo to tell.
In this post, I’m going to share my journey with you — the mistakes I made, the lessons I learned, and how I finally began to master this powerful tool in photography. Trust me, if you’ve ever been confused by aperture settings or wondered how to get that dreamy background blur, you’re not alone. Let’s dive into it together, and I promise it’ll all start to click!
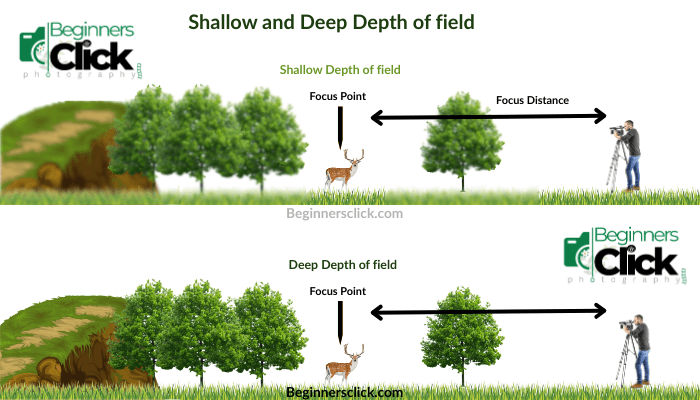
Depth of field (DoF) is a crucial concept in photography that refers to the zone of sharpness within an image. It determines the extent to which elements in front of and behind the subject appear sharp or blurred. DoF plays a significant role in influencing the overall aesthetic and impact.
Factors Affecting DoF
When I started understanding depth of field, it was like everything finally clicked. It wasn’t just about aperture settings — it’s a mix of multiple factors that make this concept so versatile in photography.
Aperture: The Key to Control Light and Focus
When I first started my photography journey, the concept of aperture was a bit confusing. I used to think that a wide aperture — like f/1.4 — was only useful for portraits, and that’s it. I would take pictures with a wide aperture and notice the soft, dreamy background blur, also known as bokeh, but I didn’t realize how powerful this tool could be across different styles of photography.
Aperture plays a much bigger role than just producing blurry backgrounds. It’s a gateway for light to enter your camera and determines the depth of field (DoF) in your image, which directly impacts how much of the image is in focus.

How Wide Aperture Enhances Portraits and Close-Ups
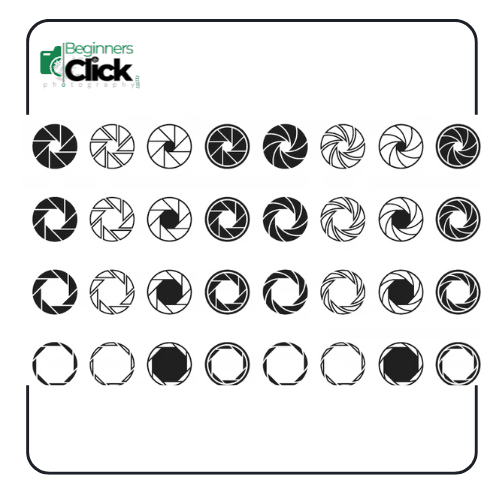
A larger aperture (which corresponds to a smaller f-number, such as f/1.4 or f/2.8) opens up the lens more widely, allowing a lot of light to reach the sensor. This shallower depth of field results in a beautifully blurred background (ideal for portraits) and keeps the subject in sharp focus. This allows you to draw the viewer’s attention directly to the subject and separate them from distracting backgrounds.
In practical terms, I’ve found that when shooting portraits or close-up shots, a wide aperture creates a dreamy, professional-looking background blur, helping the subject stand out. I’ve often used this to emphasize emotion, details, and the textures of my subject while keeping everything else soft and unobtrusive.
Using Narrow Aperture for Landscape and Maximum Sharpness
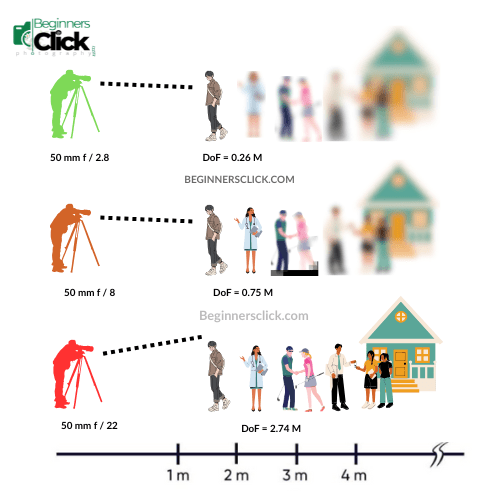
On the flip side, a smaller aperture (a larger f-number, like f/8, f/11, or f/16) reduces the amount of light coming in, resulting in a deeper depth of field. This allows you to keep more elements in focus, from the foreground all the way to the background, which is perfect for landscapes or any photo where you want everything to appear sharp and clear.
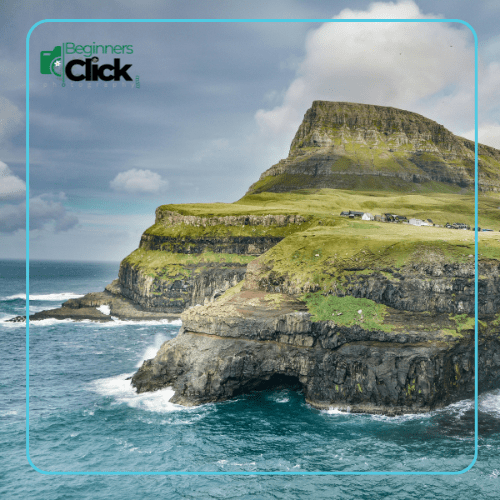
The first time I shot a wide landscape, I used a narrow aperture to ensure that everything, from the nearest rocks to the distant mountain peaks, stayed in focus. The result was an image with exceptional clarity, where every detail was sharp, making the scene appear vast and immersive.
So, while aperture is often associated with controlling light in low-light environments, its effect on depth of field is what truly defines the mood and composition of a photograph. Whether you’re focusing on a single subject or capturing an entire scene, adjusting the aperture gives you complete control over the creative outcome.
Key Takeaways:
- Wide apertures (small f-numbers) are great for isolating your subject, making it stand out with a blurred background.
- Narrow apertures (large f-numbers) ensure more of the scene is in focus, which is excellent for landscape and architectural photography.
- Aperture isn’t just for portraits — it is a versatile tool that can influence the story you want your photo to tell.
Aperture and Depth of field
Focal Length: The Magic Behind Perspective and Depth of Field
At first, I didn’t pay much attention to focal length. Honestly, I thought that any lens could do the trick. Whether it was a 35mm, 50mm, or 200mm lens, I figured they were all just about zooming in or out. But then, I started experimenting with different lenses, and I quickly realized how much focal length actually impacts depth of field (DoF) and the overall feel of the image. It wasn’t just about zooming in or out — focal length plays a massive role in how we perceive perspective, subject isolation, and background blur.
What is Focal Length?
Focal length refers to the distance between the lens’s optical center and the camera’s image sensor, usually measured in millimeters (mm). It’s one of the primary characteristics of a lens and is responsible for the magnification and field of view in an image. The focal length not only determines how much of a scene you can capture but also the perspective and depth of field in your shot.

Longer Focal Lengths: Isolation and Compression
When I first tried shooting with a 200mm lens, I was amazed by how much it compressed the scene. Things that were far away appeared much closer. This is what is called perspective compression — a longer focal length makes objects in the background appear closer to the subject.
But that’s not all. The most noticeable effect of a longer focal length is its shallower depth of field. A 200mm lens at f/2.8 gives a beautifully blurry background, perfect for isolating the subject from the surroundings. It’s like the lens focuses all the attention on the subject and creates a dreamy effect with the background.
This is why long lenses are favored in portrait photography or wildlife photography. I remember shooting a portrait of a friend at f/2.8 with a 135mm lens. The background was so beautifully blurred, the subject stood out like they were in a studio, even though we were outdoors.

Shorter Focal Lengths: Everything in Focus

On the flip side, when I switched to a 50mm lens, I noticed a huge difference. Not just in how close I could get to the subject, but in the way the depth of field changed. The 50mm lens has a wider depth of field at the same aperture setting compared to the 200mm, meaning more of the scene stays in focus, from the subject to the background.
This is great for landscape photography, where you want to capture sharp details throughout the frame — from the foreground to the distant horizon. The 50mm (or even wider lenses like 35mm or 24mm) give you more of the scene in focus, allowing for greater depth and a more immersive experience in the image. When I shot a landscape with my 50mm lens, I could clearly see the trees in the foreground, the mountains in the background, and the clouds in the sky, all crisp and sharp.
The Focal Length & Depth of Field Relationship
Here’s what I’ve learned:
- Longer focal lengths (like 85mm, 135mm, 200mm) have shallower depth of field. This is perfect for portraiture or wildlife photography, where you want to focus on the subject and blur the background. You’ll notice that the background becomes a smooth, creamy blur (bokeh), which isolates the subject beautifully.
Shorter focal lengths (like 35mm, 50mm) have deeper depth of field. This means you can keep more of the scene in focus, which is ideal for landscape photography, street photography, and architecture. You’ll capture sharper details throughout the frame, and the scene will feel more expansive.
")
Key Takeaways:
- Long focal lengths (e.g., 200mm) are great for subject isolation, compressing the background, and achieving shallow DoF.
- Short focal lengths (e.g., 50mm) offer a deeper DoF, capturing more of the scene in focus — great for landscapes and wide-angle shots.
- The perspective and compression caused by focal length can dramatically change the mood and storytelling of your photo.
Experimenting with Focal Length
The best way to really grasp the power of focal length is by experimenting. Take your 50mm lens and try shooting a subject at a distance, then take the same shot with a 200mm lens. You’ll notice how the background blurs out differently, and the perspective changes.
The more you experiment, the more you’ll understand how focal length shapes your photos and what works best for different types of photography.
Focusing Distance: The Secret to Mastering Depth of Field
In my early days of learning photography, I was surprised to discover that focusing distance plays a huge role in controlling depth of field. I always thought that aperture was the only thing that affected how much of the scene was in focus. But as I began experimenting more, I discovered that the distance between your camera and the subject plays an enormous role in controlling depth of field (DoF).
At first, it didn’t click for me. I would take a portrait of someone, using my 50mm lens, at a nice wide aperture, like f/2.8, expecting that perfect shallow DoF with a nice blurred background. And I would get it, but it wasn’t always as pronounced as I wanted. The background was somewhat blurred, but not quite that dreamy effect I’d seen in other portraits.
Then, one day, I tried something new: I moved closer to my subject while maintaining the same aperture setting. To my surprise, the background became much blurrier and my subject stood out even more. The closer I was, the shallower my depth of field became. It was like a light bulb went off in my head — focusing distance was a major factor!

How Focusing Distance Affects Depth of Field
Here’s the key to understanding how focusing distance affects DoF:
- The closer you are to your subject, the shallower your depth of field becomes, meaning the background will be more blurred and the subject will be isolated.
- The farther you are from your subject, the deeper your depth of field becomes, meaning more of the scene will be in focus, from the subject to the background.
Why Portrait Photographers Love This Trick
One of the reasons why portrait photographers often love to shoot with a wide aperture (like f/1.4, f/2, or f/2.8) and close focusing distance is that it creates beautiful subject isolation. When you move close to your subject and shoot at a wide aperture, you get that soft, blurred background, commonly referred to as bokeh. It’s a technique that makes the subject pop, drawing attention straight to them while everything around them fades away.
This is why, when I took my first close-up portrait using a wide aperture, I was able to perfectly isolate my subject against a soft, out-of-focus background. I realized that the closer I got, the more dramatic the blur in the background became, and the more intimate the shot felt.

How Focusing Distance Affects Landscape Photography

On the other hand, when I started doing landscape photography, I quickly learned that the opposite effect happens when I step back and increase the focusing distance. For landscapes, you often want everything in focus — from the foreground all the way to the distant horizon. This is where a deeper DoF comes into play.
When you move farther back and use a smaller aperture (like f/8 or f/16), the DoF deepens, allowing more of the scene to stay sharp. This technique is crucial when capturing large, sweeping landscapes, where you want to capture as much detail as possible from near to far.
Practical Examples of Focusing Distance
Portrait Photography Example:
When I first started with portraits, I learned the importance of getting close to my subject to make the background beautifully blurry. I tried shooting a portrait at f/1.8 from a few feet away, and while the subject was sharp, the background didn’t have the dreamy blur I wanted. So, I moved even closer to my subject — and voilà, the background turned into soft, creamy bokeh.

Landscape Photography Example:
For my landscape shots, I used to take a wide shot with my 50mm lens thinking I could get everything in focus. However, after learning more about focusing distance, I realized that moving back a little and using a smaller aperture (like f/11) helped create that deep focus effect where both the foreground details and distant elements were sharp. The longer the focusing distance, the more the scene came together.

Key Takeaways:
- The closer you are to the subject, the shallower the depth of field, which helps isolate the subject from the background — perfect for portraits and macro photography.
- The farther away you are from the subject, the deeper the depth of field becomes, which is ideal for landscapes, cityscapes, and any shot where you want everything to be sharp.
- Focusing distance is a powerful tool that, when combined with aperture, gives you full control over the mood and sharpness of your photo.
Experimenting with Focusing Distance
The best way to learn about focusing distance and its impact on DoF is by experimenting. Try shooting portraits at different distances from your subject and notice how it affects the background blur. Then, take a few landscape shots with varying distances and see how much more of the scene comes into focus when you increase the distance.
Applications of DoF
One of the things I love most about mastering Depth of Field (DoF) is how you can use it creatively in different types of photography. Let me take you through my personal journey of using DoF across various photography styles. It’s been such an exciting learning process, and I want to share how DoF completely changed the way I approached different subjects.
Portraits: A Game-Changer for Isolation and Focus
In the beginning of my portrait journey, I didn’t realize just how much impact a shallow depth of field could have on the final image.Before understanding the power of DoF, I would take portraits with a standard lens, but something always felt off. It wasn’t until I started using a wide aperture, like f/2.8 or f/1.8, that I truly started seeing the magic happen.
I remember this one portrait I took of a close friend. I used a large aperture, and as soon as I clicked the shutter, I saw something incredible happen — the background blurred out beautifully. The focus was solely on her face, and everything around her just melted away. It was like isolating her in a moment, a dreamy bubble of softness.
The more I experimented, the more I realized that I wasn’t just capturing a person’s face — I was capturing emotion, mood, and story. The blurry background wasn’t just a background anymore; it was a way of letting the subject speak without distraction. I could tell a story through the depth of focus, allowing the viewer to get lost in the subject without worrying about the chaos in the background.

Landscapes: Keeping It All Sharp
Now, as much as I loved working with shallow DoF in portraits, I also realized that in landscape photography, I needed a totally different approach. Initially, I would take landscape shots, but something wasn’t quite right. The foreground was in focus, but the background mountains were blurry. This wasn’t the result I wanted.
One day, I decided to experiment by using a smaller aperture — something like f/16. To my amazement, everything from the foreground flowers to the distant mountains stayed in sharp focus. It was like I had captured the entire scene, every tiny detail, without losing any clarity.
That’s when I truly began to appreciate deep depth of field. It’s not just about getting everything in focus; it’s about telling the story of the entire landscape. A deeper DoF creates a sense of immensity, like you’re experiencing the vastness of the scene in one shot. From the grass at your feet to the distant mountains, it feels like you’re right there, breathing in every bit of the view.
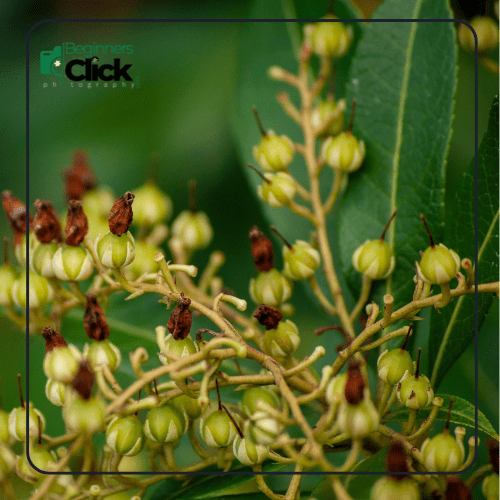
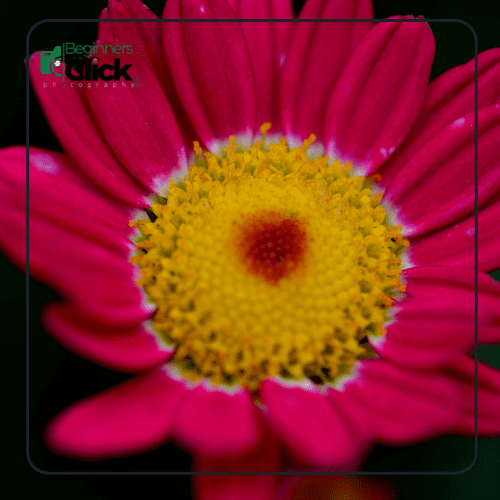
Macro Photography: The Superpower of DoF
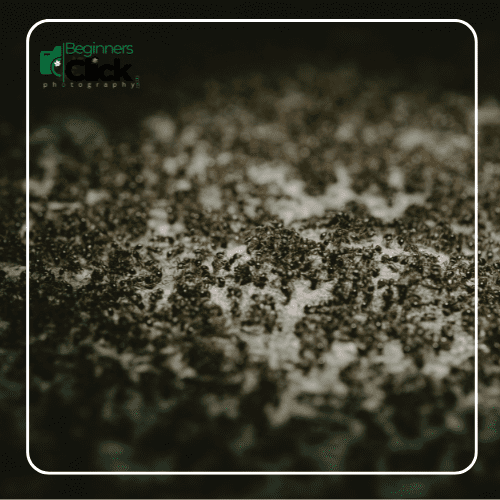
But here’s where it got really interesting: macro photography. I always thought macro photography would be easy, like shooting anything up close. But when I tried to capture tiny details, like a bug on a flower or a dewdrop on a leaf, I ran into a problem. I used the same aperture settings I would use for portraits, but when I zoomed in, only a tiny part of the insect would be in focus — everything else was blurry.
It took me a while to figure out why. The issue was, macro photography requires a very small depth of field to focus on such tiny subjects. So, I switched to using a small aperture, like f/16 or f/22, and finally, I got the image I was hoping for. Every detail of the bug was sharp, from its legs to its wings, and the background was beautifully blurred, creating an artistic contrast. It felt like a superpower — capturing every little detail of nature that I never thought I could.
Key Takeaways
- Shallow DoF is perfect for portrait photography, where you want to isolate your subject and make them stand out from the background.
- Deep DoF is essential for landscape photography, ensuring that everything in the frame, from the foreground to the horizon, remains sharp and detailed.
- Macro photography requires a smaller aperture to keep tiny subjects in focus and reveal the intricate details of the natural world.
Mastering Depth of Field (DOF) in Action
By now, if you’ve been following along with me, you’re probably itching to give Depth of Field (DoF) a try yourself. I get it — it’s a fascinating concept, and honestly, it took me quite a while to fully understand it. But once I did, I realized how much control I had over the mood and focus of my photos.
When I first began experimenting with DoF, I felt a little lost. There was so much to learn, and I kept making mistakes. But, like most things in photography, it all came together once I spent time practicing and learning from those mistakes. Here’s how I dove into it, step by step:
Experiment with Aperture:
I remember the first time I decided to experiment with aperture. I had just gotten a new camera lens — a 50mm f/1.8, and I was super excited to see what it could do. I spent an entire day playing with the aperture settings, starting from f/1.4, all the way up to f/16. I remember feeling completely amazed at how each change dramatically altered the look of my photos.
At f/1.4, the background blurred out completely, and the subject (usually my friend or a plant) was so sharply in focus that it felt like they were popping out of the photo. But, of course, there were some challenges. Sometimes, the subject would be too blurry or the focus wouldn’t lock exactly where I wanted it.
Then I cranked the aperture to f/16. The depth of field expanded, and suddenly, everything from the foreground to the background was sharp. I was amazed! But here’s the thing — at f/16, I had to deal with less light, and that meant I had to adjust other settings like shutter speed and ISO. I made plenty of mistakes (hello, blurry landscapes!), but with every shot, I started to see how powerful aperture could be. It was like I was learning the language of light in real-time.
Adjust Focal Length:
After playing with aperture, I moved on to focal length. I remember grabbing both my 50mm lens and my 200mm lens for a little comparison. I shot the same subject at both focal lengths and noticed a huge difference in how the depth of field was affecting the images.
When I used the 50mm lens, everything seemed to stay in focus. I could capture an entire scene — everything from the flowers in the foreground to the distant horizon remained sharp. It was great for capturing wide scenes or group shots.
But when I switched to the 200mm lens, it was a whole new world. Suddenly, the subject was beautifully isolated from the background. The distance between the lens and the subject made the background blur out dramatically, and the focus was razor-sharp. I could feel the difference — the 50mm lens was like a wide view of everything, while the 200mm lens was all about focus and isolation.
That’s when it hit me: focal length doesn’t just change how much you see; it shapes how you see the subject. With a longer focal length, I could create that dreamy effect where everything in the background just melted away, bringing all the attention to my subject.
Control Distance:
Finally, there was focusing distance. This was the one that took me the longest to really understand. At first, I didn’t get how the distance between me and my subject could affect the DoF so much. I thought if I set the aperture right, everything else would fall into place. But when I started focusing on subjects at different distances, that’s when I really saw the magic of DoF unfold.
When I stood closer to the subject, I noticed that the depth of field became shallower. The background blurred out, and the subject seemed to pop in a way that I couldn’t achieve by just adjusting the aperture. It was like I was able to isolate the subject even more.
The coolest part? When I moved farther away, I could see how the DoF deepened, and more of the scene came into focus. I took a photo of a tree with the leaves in the foreground and the sky in the background. When I was closer, only the leaves were in focus, and the sky blurred out. But as I stepped back, the entire tree and the sky behind it came into sharp focus.

My Biggest Lesson:
I think the biggest lesson I’ve learned is that DoF isn’t just about aperture or focal length alone. It’s about how you use all three elements together — aperture, focal length, and focusing distance — to craft the story you want to tell in your photo.
- Shallow DoF (wide aperture + long focal length + close focusing distance) isolates the subject and makes it stand out.
- Deep DoF (small aperture + wide-angle lens + distant subject) captures the vastness of a scene, from foreground to background.
Photography, for me, started out as a process of trial and error. I’d make mistakes, but I learned from every shot. Each photo, whether a portrait or landscape, was a step closer to mastering the art of Depth of Field. I began to realize that DoF is not just a technical tool — it’s a creative tool that helps tell the story you want to share with your audience.
So, grab your camera and start experimenting! Try different apertures, focal lengths, and distances. See how these elements work together, and let them guide you toward more powerful, creative photos. Trust me, you’ll be amazed at what you discover.
Advanced Techniques - Focus Stacking and Focus Peaking
Once I had the basics down, I started exploring advanced techniques like Focus Stacking and Focus Peaking. These techniques may sound a bit complex at first, but trust me, they are absolutely worth it.
Focus Stacking: The Magic for Macro Photography
When I first ventured into macro photography, I had a very specific goal: I wanted everything to be in focus — from the front of my subject to the back. But the reality was, achieving this with a single shot was almost impossible. I would focus on the foreground, but the background would end up out of focus. Conversely, when I focused on the background, the foreground details would get blurred.
That’s when I discovered Focus Stacking, a technique that completely changed my approach to macro photography. Focus Stacking involves taking several shots of the same subject, each with a different focus point, and then blending them together in post-processing software. This process allows you to create an image where every part of the subject is in focus, from the closest point to the farthest.
For example, when I was photographing a flower up close, I took one shot focusing on the petals, then another focusing on the stem, and so on. Later, I combined those shots using editing software. The result? A perfectly sharp image with a deep, detailed focus throughout the entire subject.
It does take a bit more effort than a simple one-shot photo, but the outcome is absolutely worth it. It feels like a magic trick—capturing every little detail in sharp focus, something I thought was impossible in macro photography.
Focus Peaking: Precision at Its Best

Another game-changer for me was the Focus Peaking feature on some of my cameras. When I first started shooting at very shallow depths of field, I struggled with manual focus. At wide apertures like f/1.8 or f/2, the focus area was so narrow that I couldn’t always tell if I was focusing exactly where I wanted.
This is where Focus Peaking came in. Focus peaking is a feature that highlights the areas of the image that are in focus with a visible color overlay (typically yellow, red, or green). This allowed me to see exactly where the focus was, making it much easier to ensure my subject was perfectly sharp.
At first, I thought I could rely on just the autofocus system. But when I began using manual focus, especially for shallow DoF shots or when shooting macro subjects, the Focus Peaking feature became invaluable. It gave me a much more precise control over the focus, ensuring that I was getting the best shot every time. This feature was especially useful for shooting in conditions where the autofocus couldn’t lock onto the right spot, like when I was working with very close subjects or in low light.
A Photographer’s Power Tools
By incorporating Focus Stacking and Focus Peaking into my workflow, I was able to push my photography to new levels. Focus Stacking helped me capture every tiny detail in my macro shots, and Focus Peaking made manual focus a breeze. These advanced techniques opened up new creative possibilities and helped me achieve the results I never thought were possible.
So, if you’re ready to take your photography to the next level, don’t shy away from these powerful tools. Embrace them, experiment with them, and watch your photos reach new heights of precision and clarity!
Common Mistakes with DOF: Learning Through My Journey
Looking back at my early days of photography, I realize that I made a ton of mistakes when it came to using Depth of Field (DoF). At first, I thought it was all about getting the right aperture setting and just shooting away, but quickly, I realized there’s so much more to it. Here are a few of the major mistakes I made and the lessons I learned from them:
Misfocusing: The Unseen Struggle
One of the first mistakes I made was misfocusing. When I started experimenting with shallow DoF, I was so focused on adjusting the aperture and trying to capture that dreamy background blur that I didn’t pay enough attention to where my focus point actually was. I’d take a shot, all excited about the result, only to find out that my subject was out of focus, and everything else was a blurry mess.
It was frustrating at first, especially since I couldn’t figure out why the shots weren’t turning out the way I imagined. But after countless blurry photos, I realized I was not being precise enough with my focus. The key here is to double-check the focus point before you shoot. With shallow DoF, it’s so easy to miss that sweet spot, but once you lock the focus on your subject, everything falls into place. Now, I make it a habit to always zoom in on the focus point before pressing the shutter, ensuring the subject is crystal clear.
Forgetting the Background: The Hidden Danger
Another common mistake I made was forgetting about the background. It’s easy to get so focused on the subject that you completely ignore what’s happening behind it. With shallow DoF, the background blurs out naturally, but sometimes I would forget that certain elements in the background could be distracting, even if they were blurred.
I remember one portrait shoot where the background was full of bright, chaotic colors, and even though the subject was sharp and beautifully isolated, the background still made the photo feel off. It wasn’t until I looked at the shot later that I realized the distracting elements — a brightly colored sign and a person walking in the distance — were causing the image to feel cluttered, even with a blurred background.
I learned that mindful composition is just as important as focusing. Before shooting, I now make sure to pay attention to the background and ensure there’s no clutter or distracting elements that could take attention away from the subject. Sometimes, it’s as simple as adjusting your position or changing the angle slightly to eliminate unwanted background distractions.
Ignoring Subject Placement: Too Close, Too Messy
This was a mistake I made early on, and it took me a while to figure out: subject placement matters a lot when you’re working with a shallow DoF. At first, I didn’t realize that the distance between the subject and the background plays a huge role in how the background blur (bokeh) looks.
For example, I’d have a subject close to the background, expecting the blur to look smooth, but instead, the background didn’t blur effectively. It just ended up looking like a messy, chaotic blur, and the subject didn’t stand out as well as I wanted. This was especially true for portrait shots when I was trying to isolate the subject with a blurred background.
The lesson here? Make sure your subject has enough space from the background. The farther the subject is from the background, the more pronounced the blur becomes. If the subject is too close to the background, even with a shallow DoF, the background might not blur out the way you expect, resulting in an image that lacks focus. Now, I always pay attention to the distance between the subject and the background, making sure the subject has enough separation to get that smooth bokeh effect.
Bonus Mistake: Overusing Shallow DoF
Okay, this wasn’t technically part of the three common mistakes I made, but it’s a mistake that I think every photographer, including myself, can fall into at some point: overusing shallow DoF.
At first, I was obsessed with the blurry background effect and used it in almost every shot, thinking it was the key to making every photo look more professional. But over time, I realized that shallow DoF isn’t always the answer. Sometimes, a deep DoF works better, especially for landscapes or environmental portraits where you want to capture the entire scene with sharp focus.
The key takeaway here is that DoF should be used as a creative tool to tell the story, not just as a trick to make everything look “professional.” Sometimes, it’s okay to embrace more of the scene in focus to give context to the subject.
The Bigger Picture: Learning Through Mistakes
Looking back at all these mistakes, I realize they were all part of my learning curve. Depth of Field is a powerful tool, but it requires more than just tweaking your aperture settings. You have to be mindful of focus points, background distractions, and subject placement to truly use it creatively.
My journey with DoF hasn’t been perfect, but each mistake taught me something valuable, and now I feel much more confident in using it to create the exact shots I envision. If you’re just starting out, don’t worry about making mistakes — they’re just part of the process. Embrace them, learn from them, and keep experimenting.
DOF and Composition: Making the Most of Depth of Field in Creative Photography
As I progressed in my journey with Depth of Field (DoF), I started to realize that it wasn’t just about getting a good shot of a subject. Composition was just as important — how I placed my subject, how the scene was framed, and how the DoF could enhance the overall message of the photo. Here’s how I started thinking about composition more strategically with DOF:
Leading Lines: Drawing the Eye to the Subject
One of the most effective composition techniques I stumbled upon was the use of leading lines. I’ll admit, at first, I was all about capturing the subject with no thought to the background or surroundings. But then, I began experimenting with how lines in the environment could guide the viewer’s eyes directly to the subject.
For example, in a portrait, I’d use natural elements like paths, fences, or trees to create a line that would lead directly to the subject. The best part? Shallow DoF took this to the next level! The background blurred beautifully, allowing the leading lines to pop even more. It added a dynamic element to the image, making the viewer’s eye move fluidly through the photo, almost like they were being guided toward the main subject.
I vividly remember a portrait I took in a garden. The pathway in the foreground led straight to my subject, a person standing in the middle of the path. With a shallow DoF, the path and greenery blurred, but the lines still created a natural flow, making the subject feel like they were the destination of the photo. It added an intentional movement to the shot that felt really powerful.
Negative Space: Isolating the Subject
Another lesson I learned through experimentation was the power of negative space. Initially, I used to fill the frame with as much detail as possible — plants, objects, or other people. But after seeing some professional works and experimenting myself, I started to appreciate the simplicity and elegance of negative space.
Using negative space with shallow DoF allows the subject to breathe and stand out even more. It creates a sense of isolation, almost like the subject is floating in its own little world. At first, it felt like I was leaving too much “empty” space around my subject, but the more I tried it, the more I realized how effective it was in creating visual interest.
One of my favorite examples of this was a portrait I took of a woman standing on a beach at sunset. I kept a lot of open space on one side of her and blurred the background with a shallow DoF. The result was striking — the subject felt like she was surrounded by space, almost giving her an ethereal quality. The empty space around her didn’t feel wasted, but rather gave her more visual importance. It was like I had created a personal space for the subject within the composition.
Layering: Creating Depth in Landscapes
When it came to landscape photography, I encountered a completely new challenge — how to make the vastness of the scene feel dynamic and not just a flat image. I wanted to bring depth and dimension to my landscape shots, so I turned to layering as a technique.
Layering involves creating multiple visual planes in your composition — foreground, midground, and background. I remember shooting a wide landscape with trees, mountains, and a sky full of clouds. Instead of just focusing on the mountains, I decided to layer the composition by including some foreground elements like flowers or grass, midground elements like trees, and the distant mountains and sky in the background.
With a deeper DoF, I could capture all the layers in sharp focus. This created a sense of depth that allowed the viewer’s eye to travel naturally from the flowers in the foreground, through the trees in the midground, and all the way to the distant mountains. It made the scene feel more immersive, as though the viewer was stepping into the landscape.
The Impact of DoF on Composition
What I eventually realized was that Depth of Field wasn’t just about sharpness or blur. It was about shaping the viewer’s experience and guiding their eye throughout the image. It’s about deciding what you want the viewer to notice first and what you want to fade into the background.
- Shallow DoF is perfect for isolating subjects, creating that dreamy blur in the background, and allowing the subject to pop out of the image.
Deep DoF, on the other hand, works wonders for landscapes or any scene where you want everything in focus, creating that layered feeling and guiding the viewer’s eye through the different planes of the image.
Lessons Learned: The Art of Combining DoF and Composition
Now, I approach every shot thinking about how DoF can complement my composition. Shallow DoF isn’t just for portraits — it’s a great tool for isolation and focus, guiding the viewer directly to what’s most important. On the other hand, deep DoF gives me the ability to capture the entire scene, creating depth and layers that make the image feel larger than life.
As I look at my photos now, I realize how important it is to plan the composition first, and then choose the right DoF to match. The two go hand-in-hand — composition gives the image structure, and DoF adds the emotional depth.
Depth of field is a powerful tool for photographers to control the sharpness and focus within an image, guiding the viewer’s eye and enhancing the storytelling potential of a photograph. By understanding the factors that influence DoF, photographers can make informed decisions about aperture, focal length, and focusing distance to achieve their desired creative effects.
Final Thoughts
Depth of field is an incredibly powerful tool that helped me develop my unique style in photography. Whether you’re isolating a subject in a portrait, capturing a vast landscape, or focusing on tiny details in macro shots, DoF is the key to enhancing the storytelling in your photos.
By understanding and experimenting with aperture, focal length, and distance, you can take full control of how your photos come out, just like I did. So, get out there and start shooting! The more you experiment, the better you’ll understand how to use DoF to express your creativity.
Frequently Asked Questions (FAQ)
Depth of field (DoF) refers to the area in your photo that appears in focus. A shallow depth of field means only a small part of the image is sharp, while a deep depth of field means a larger portion of the image is in focus. It’s determined by factors like aperture, focal length, and the distance between the camera and the subject.
Aperture controls the amount of light entering the camera, and it significantly influences the depth of field. A larger aperture (smaller f-number) results in a shallow depth of field, blurring the background and focusing on the subject. A smaller aperture (larger f-number) results in a deeper depth of field, keeping both foreground and background in focus.
Shallow depth of field is when only a small portion of the image is in focus, often used in portraits to isolate the subject from the background. Deep depth of field keeps everything sharp, from the foreground to the background, and is commonly used in landscape photography.
Longer focal lengths (like 200mm) generally produce a shallower depth of field, blurring the background more effectively. Shorter focal lengths (like 50mm) create a deeper depth of field, keeping more of the scene in focus.
The closer you are to your subject, the shallower the depth of field becomes. As you move farther away, the depth of field increases, allowing more of the scene to stay in focus.
You can use depth of field creatively to direct the viewer’s attention. For example, a shallow depth of field isolates your subject in a portrait, while a deep depth of field can create a sense of space in landscapes or cityscapes. Experimenting with focus and background blur also adds an artistic touch to your photos.
Bokeh refers to the aesthetic quality of the blurred background in a photo. A shallow depth of field, achieved by using a wide aperture, creates a pleasing bokeh effect, which can add an artistic, dreamy feel to your images.
Common mistakes include misfocusing (not getting your subject in focus), forgetting to consider the background (distracting elements), and placing the subject too close to the background, which reduces the effectiveness of the blur.
While some effects like background blur can be mimicked in post-processing, it’s best to get the depth of field right in-camera. However, for advanced techniques like focus stacking, post-processing can help achieve a sharp image from foreground to background.

You are my inspiration , I have few web logs and sometimes run out from to post : (.
Keep working ,impressive job!
Thank you so much! Your words mean a lot. I’ll definitely keep working and sharing more helpful content. Stay with me!
amei este site. Pra saber mais detalhes acesse o site e descubra mais. Todas as informações contidas são informações relevantes e exclusivos. Tudo que você precisa saber está está lá.
Muito obrigado pelo seu carinho e comentário gentil! Fico feliz em saber que você gostou do site. Estou sempre tentando compartilhar conteúdos úteis e relevantes. Fique à vontade para explorar mais e deixar sua opinião — será sempre bem-vindo(a)!
An interesting discussion is worth comment. I think that you should write more on this topic, it might not be a taboo subject but generally people are not enough to speak on such topics. To the next. Cheers
Thank you so much for your thoughtful comment! I truly appreciate your perspective. You’re right—this is a topic that deserves more open discussion, and I’m glad you found it engaging. I’ll definitely consider writing more about it in the future. Stay connected!
It is actually a nice and helpful piece of information. I’m happy that you just shared this useful information with us. Please stay us informed like this. Thanks for sharing.
Thank you so much for your kind words! I’m really glad you found the information helpful. I’ll do my best to keep sharing useful content. Stay connected! 😊
Very interesting info!Perfect just what I was searching for!
Thank you so much! I’m really glad the post gave you exactly what you were looking for. Your feedback truly means a lot. Stay tuned for more helpful content!
Im not certain where you are getting your information, however good topic. I needs to spend a while finding out much more or working out more. Thank you for magnificent information I used to be in search of this info for my mission.
Thank you so much for your thoughtful comment! I’m glad the article was helpful for your research. I try my best to gather reliable and practical information for readers like you. Wishing you the very best with your mission — feel free to revisit anytime or ask if you need anything more!
Utterly written subject material, thank you for selective information. “The bravest thing you can do when you are not brave is to profess courage and act accordingly.” by Corra Harris.
Thank you so much for your thoughtful comment and for sharing that inspiring quote by Corra Harris!
I truly appreciate your engagement and am glad you found the content meaningful. It’s quotes like these—and readers like you—that add so much depth to any discussion. Stay connected and feel free to share your thoughts anytime!
Its like you read my mind! You seem to know so much about this, like you wrote the book in it or something. I think that you can do with a few pics to drive the message home a bit, but instead of that, this is great blog. A great read. I’ll definitely be back.
Thank you so much for your thoughtful comment! I’m really glad you enjoyed the post and found it insightful. You’re absolutely right — adding a few relevant images could enhance the experience even more. I truly appreciate your feedback and will keep it in mind for future updates. Looking forward to having you back on the blog again soon!
With havin so much content do you ever run into any issues of plagorism or copyright infringement? My website has a lot of unique content I’ve either written myself or outsourced but it appears a lot of it is popping it up all over the internet without my permission. Do you know any ways to help prevent content from being stolen? I’d definitely appreciate it.
Thank you for bringing up such an important point! Yes, content theft is a common issue many bloggers face, especially when they publish unique and valuable content. While it’s difficult to stop it completely, there are a few things you can do to reduce the problem:
Use plagiarism checker tools to monitor where your content appears.
Set up Google Alerts with your blog’s keywords or sentences to track unauthorized copies.
Add a copyright notice and DMCA protection badge on your site.
If you find someone copying your content, you can file a DMCA takedown request.
I completely understand your frustration—it happens to me too. The key is to keep creating high-quality, original content while taking some protective measures.
Nice post. I learn something more challenging on different blogs everyday. It will always be stimulating to read content from other writers and practice a little something from their store. I’d prefer to use some with the content on my blog whether you don’t mind. Natually I’ll give you a link on your web blog. Thanks for sharing.
Thank you so much! 😊 I’m glad you found the post helpful and inspiring. You’re welcome to use some of the content on your blog, and I really appreciate that you’ll include a link back to my site. It’s wonderful to see ideas being shared and practiced!
Hello. Great job. I did not imagine this. This is a splendid story. Thanks!
Thank you so much! I’m glad you enjoyed it. Your feedback means a lot and motivates me to keep sharing more great content.
I am extremely impressed with your writing skills as well as with the layout on your weblog. Is this a paid theme or did you modify it yourself? Anyway keep up the nice quality writing, it is rare to see a nice blog like this one nowadays..
Thank you so much for the kind words! 😊 The theme is [mention if paid or free/customized]. I’ve done some modifications myself to match the style I wanted. Really glad you liked both the writing and layout—it means a lot!
You made several fine points there. I did a search on the theme and found mainly folks will consent with your blog.
I really appreciate you taking the time to look into it! 🙏 It’s great to know that others also agree with the points I’ve shared. Thanks a lot for your support!
so much excellent info on here, : D.
Thanks