Table of Contents
ToggleThe Magic Behind the Click: How Digital Cameras Capture Images
Have you ever wondered how your digital camera works to capture a photo in just a fraction of a second?
I still remember the first time I held a DSLR in my hands. I was so excited, clicking pictures left and right. But one thought kept circling in my head — “What actually happens inside this camera when I press the shutter button?”
I mean, how does this little machine freeze a moment of light so quickly? It felt like some kind of magic.
That was the beginning of my journey, trying to uncover the mystery of how cameras “trap light.”
In this post, I want to share that journey with you — not in a technical, textbook way, but as a friendly conversation. I’ll tell you about how sensors work, what role the shutter plays, and why lenses are so important — all in the simplest way possible.
I’ve made plenty of mistakes and learned through trial and error, and I hope my experiences help make things easier for you.
So, grab a cup of tea (or coffee!) and let’s take a relaxed trip into the heart of your digital camera.
No magic tricks — just the beautiful science behind every captured moment.
The Magic Behind the Click: How Digital Cameras Capture Images
When I first got into photography, I had no idea what was going on inside the camera. I just pointed, clicked, and hoped for the best. I remember taking a picture of a flower once — it looked amazing on the camera screen, but when I zoomed in, it was blurry. I thought maybe the camera was broken! 😅
That curiosity pushed me to look deeper. I kept asking, “What’s happening when I press this button?”
By understanding these core components, you can know about digital cameras inside, and how digital cameras can work for taking images. It’s a general overview of camera insights. Not deep technical knowledge or deep mechanical knowledge.
This knowledge will help you to control the camera or will help you to know the deep knowledge about ISO, shutter speed, and aperture.
Ok, let’s move.
This knowledge will help you to control the camera or will help you to know the deep knowledge about ISO, shutter speed, and aperture.
Ok, let’s move.
- Viewing System – With My Learning Experience
- Sensor – My Light & Confusion Moment
-
Shutter – When I Tried to Photograph My Dog…
- Aperture – The Day I Fell in Love with Bokeh
- Large Aperture
- Small Aperture
- Lens & Focus – My Struggle with Sharpness
-
Fill-up Mirror – The DSLR Secret I Never Knew
- Final Thoughts – From Confused to Confident
- FAQ Section
- ISO – The Setting I Ignored Until My Indoor Photos Looked Terrible
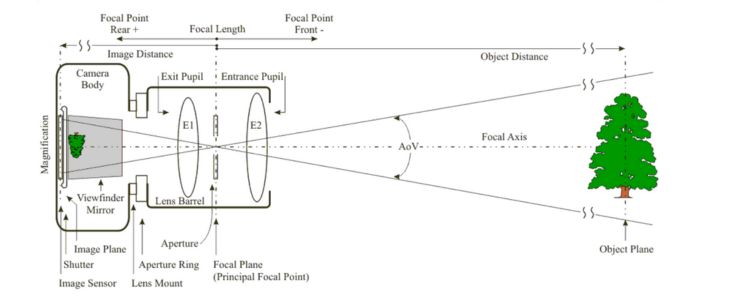
Viewing System – With My Learning Experience
At first, I used to think — whatever I see on the back screen is what I’ll get. And that was mostly true. But when I borrowed my friend’s DSLR, I looked through the little glass window (which I now know is the optical viewfinder) and thought, “Wait… this looks clearer!”
I remember the confusion — I asked, “Why does it look different than the LCD?” That’s when I learned there are two viewing systems. And yes, I messed up a lot of shots early on because I didn’t know the difference!
There are two main viewing systems:
- Optical Viewfinder (SLR only):This uses a mirror (the reflex mirror) to reflect light coming through the lens (point no 1) upwards to a prism. The prism bends the light path (starting from point no 1 then 2, 3, 4, and 5) to the viewfinder, allowing you to see exactly what the lens captures.
- Electronic Viewfinder (EVF):This is a digital screen that displays the live image from the image sensor. It’s found in mirrorless cameras and on the back LCD screen of most cameras. But a better view, an optical viewfinder, is better for a photographer because the actual view can be made through the optical viewfinder.

Over time, I began to appreciate how much better it is to shoot through the optical viewfinder — no screen glare, no lag, and you see the real deal. Now, I can’t imagine composing a shot without it.
Sensor – My Light & Confusion Moment
When I first started using my camera in manual mode, I remember staring at a completely black photo and wondering — “Wait… why didn’t anything show up?” I thought maybe the lens cap was still on. Spoiler alert: it wasn’t.
The truth was, I had no idea what a sensor really did. I used to think the camera somehow magically knew what to record. But slowly, after trial and error (and many blank photos), I realized — it’s the sensor that receives the light.
The sensor is the heart of a modern camera which produces the images from light.
It’s an electronic chip covered in millions of tiny light-sensitive sites called photosites. When light hits these sites, they convert it into electrical signals. These signals are then processed to create a digital image.
After clicking, this sensor within milliseconds produces the image and displays it to the Electronic Viewfinder (EVF).
Once I truly understood this, things started to click — pun intended. 😄 I learned to balance light and use ISO better, because the sensor isn’t magic — it’s smart, but it needs help.
Shutter – When I Tried to Photograph My Dog...
I still laugh at one of my earliest photos — I tried to photograph my dog running toward me in bright daylight. The result? A glowing blur that looked more like a ghost than a pet. I had no idea what went wrong.
Later, I learned it was the shutter speed. It was open too long. Every movement blurred. That day, I promised myself to understand what this “shutter” really does.
The shutter acts like a curtain, controlling how long light hits the sensor.
The amount of light that reaches the sensor depends on how long the shutter remains open or closed.
If the shutter stays open for a long time, more light enters, causing blur — especially with motion. If it opens briefly, it freezes the moment. This is particularly crucial for capturing moving subjects.
Once I understood this, I began experimenting — slow shutter for light trails at night, fast shutter for freezing a splash of water. And suddenly, photography became a playground!

Aperture – The Day I Fell in Love with Bokeh
I still remember one afternoon, just before sunset, I took a portrait of my friend beside a field. When I looked at the image, the background had turned into these dreamy, creamy circles of light. I didn’t know what I did, but it felt magical. That was my first unintentional encounter with bokeh. It made me curious: what made that soft blur happen?
That curiosity led me to learn about aperture — and trust me, it wasn’t easy at first.
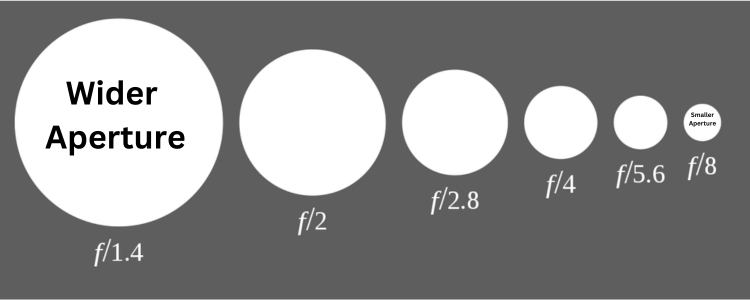
The aperture is the opening inside the lens that controls how much light enters the camera, just like how the iris of our eye controls light entering the retina.
But here’s where it gets even more interesting: aperture also controls something called depth of field, which determines how much of your photo will be in focus.
- A large aperture (like f/1.8 or f/2.8) means the lens opens wider, allowing more light in and creating a shallow depth of field. Only a small portion of the photo will be sharp, while the rest becomes soft and blurred — perfect for portraits.
- A small aperture (like f/11 or f/16) lets in less light but increases the depth of field, making more of the image sharp and detailed — ideal for landscapes.

At first, I was confused. Sometimes I’d accidentally blur the subject instead of the background. Other times, everything was in focus when I only wanted the face to pop.
But slowly, through mistakes and experimenting, I realized: aperture isn’t just a setting — it’s a storytelling tool.
Aperture is measured in f-stops, and it might sound technical, but the idea is simple:
- Lower f-number = more light + shallow focus
- Higher f-number = less light + deeper focus
Now, every time I change the aperture, I feel like I’m not just adjusting light — I’m shaping how the viewer will feel the image. And that’s a powerful thing.
Impact of Aperture on Light and Depth of Field
In summary, the aperture controls the amount of light that enters the camera and the “depth of field” of the image. Large apertures allow more light and create a shallow depth of field, while small apertures allow less light and create a deep depth of field.
Aperture is typically measured in f-stops, which is a standardized way of expressing the size of the aperture opening. A smaller f-number indicates a larger aperture, while a larger f-number indicates a smaller aperture.
If you want to know details about Depth of field, you have to read my another article about basic of Depth of field.

Lens & Focus – My Struggle with Sharpness
Have you ever taken a photo and later realized that the background is sharper than the subject? I’ve been there many times.
At first, I thought my camera was faulty. But soon I realized — it was me, not the camera. I wasn’t focusing properly.
The lens is made of multiple elements that bend and direct light onto the sensor.
Focusing is about adjusting those lens elements to make your subject appear sharp.
There are two types:
- Autofocus (AF):
Super convenient! But not always accurate, especially in low light. - Manual Focus (MF):
I avoided this like the plague at first. But once I practiced, I began to love the control it gave me. You actually feel connected to the shot.
Every blurry photo was a lesson. Today, I still miss focus sometimes, but now I understand why — and that’s what makes all the difference.
Fill-up Mirror – The DSLR Secret I Never Knew
The first time I heard the sound of a DSLR clicking, I thought — “What’s that clap?”
Later, I discovered it was the reflex mirror flipping up and down. I had no clue such a thing even existed!
This “fill-up mirror” (as it’s sometimes called) reflects the light to the optical viewfinder while you compose your shot.
Then, just before the photo is taken, the mirror flips up, allowing light to reach the sensor instead.
It blew my mind. Cameras aren’t just electronics — they’re mechanical marvels!

Final Thoughts – From Confused to Confident
If you’ve ever felt overwhelmed by camera settings — believe me, I’ve been there.
I fumbled with focus, blurred entire shoots, and didn’t know the difference between ISO and avocado 🥴 (okay, maybe not that bad).
But over time, through every mistake, I learned. And today I’m sharing this with you — because if I can learn, so can you.
By working together, these components capture a single image:
- The viewing system helps you frame it
- The sensor records the light
- The shutter decides the timing
- The aperture shapes the depth
- The lens and focus bring it all into clarity
So, take your time, make mistakes, and keep clicking.
Because every shot teaches you something, and every mistake is a step closer to mastery.
ISO – The Setting I Ignored Until My Indoor Photos Looked Terrible
When I first started shooting indoors, I was often disappointed. The pictures came out dark, or worse, full of ugly grain. I thought, “Maybe my camera isn’t good enough?”
Turns out, it wasn’t the camera — it was me. Or more specifically, my lack of understanding of ISO.
I had left ISO on “Auto” and didn’t bother to learn what it did. But when I finally looked into it, everything changed.
ISO controls how sensitive your camera’s sensor is to light.
- A low ISO (like 100 or 200) is perfect for bright outdoor conditions — it gives clean, noise-free images.
A high ISO (like 1600 or 3200) helps in dark settings, but it adds grain/noise to the image.
Once I understood this, I began using lower ISO in daylight and higher ISO only when absolutely necessary, like night shoots or dim indoor scenes.
Just adjusting ISO based on light conditions made a huge difference in the quality of my photos. And honestly, I wish I had figured it out sooner — it would’ve saved me hundreds of dull, grainy shots!
Recommended Beginner Camera Gear
1. Canon EOS Rebel T7 DSLR Camera
The Canon EOS Rebel T7 is one of the best entry-level DSLR cameras you can buy. It features an easy-to-use interface, built-in Wi-Fi, and excellent image quality for beginners. The 24.1 MP sensor captures sharp details, while the DIGIC 4+ image processor ensures smooth performance. If you’re just starting out with photography, this camera will give you the flexibility to experiment with manual settings, while also having an auto mode for quick shots. The Rebel T7 is lightweight, budget-friendly, and a solid first DSLR for learning photography.

2. Nikon D3500 DSLR Camera
The Nikon D3500 is another highly recommended DSLR for beginners. Known for its incredible battery life (over 1500 shots per charge), it’s perfect for long shooting sessions. It has a 24.2 MP sensor with excellent low-light performance, and the camera body is compact and lightweight, making it very portable. Nikon also provides a beginner-friendly guide mode, which helps new photographers learn settings step by step. Whether you want to shoot portraits, landscapes, or travel photos, the D3500 is a reliable companion.
3. Canon EF 50mm f/1.8 Lens (“Nifty Fifty”)
Every beginner should have a 50mm prime lens in their bag. The Canon EF 50mm f/1.8 is famous for its sharpness and beautiful background blur (bokeh). It’s excellent for portraits, indoor photography, and even low-light situations thanks to the wide f/1.8 aperture. This lens is also very affordable, making it one of the best upgrades from a kit lens. If you want to take your portraits to the next level, this is the lens to get.
4. SanDisk 128GB Extreme SD Card
A fast and reliable memory card is just as important as the camera itself. The SanDisk 128GB Extreme SD Card offers high-speed performance (up to 150MB/s read speed), which is ideal for burst photography and 4K video recording. Beginners often underestimate the importance of a good memory card, but having one prevents lag and ensures your photos and videos are stored safely. Plus, the 128GB storage gives you plenty of room for long shooting sessions.
5. Sony Alpha a6100 Mirrorless Camera
If you prefer mirrorless cameras over DSLRs, the Sony Alpha a6100 is a fantastic choice. It’s lightweight, fast, and offers superb autofocus with real-time tracking, making it easier for beginners to capture sharp photos. The 24.2 MP APS-C sensor produces stunning images, and it also performs well in low light. With 4K video capabilities, it’s a versatile option for those interested in both photography and vlogging.
6. Fujifilm X-T30 II Mirrorless Camera
The Fujifilm X-T30 II is a stylish and compact mirrorless camera that delivers professional-quality images. Its film simulation modes are particularly attractive to beginners who want vibrant, ready-to-share photos straight out of the camera. It has fast autofocus, a 26.1 MP sensor, and 4K video support. This camera is slightly more advanced, but beginners will love how intuitive and enjoyable it is to use.
7. Manfrotto Compact Action Tripod
A tripod is a must-have accessory for beginners, especially for low-light photography, night shots, or long exposures. The Manfrotto Compact Action Tripod is sturdy, lightweight, and very easy to carry. Its quick-release plate makes attaching and removing the camera simple, and the ergonomic joystick head gives smooth control for framing shots. If you want sharper photos and stable videos, a tripod like this is essential.
8. Neewer 660 LED Video Light Kit
Lighting can make or break your photos. The Neewer 660 LED Video Light Kit is perfect for beginners who want to experiment with studio or portrait photography. It comes with adjustable brightness and color temperature, allowing you to create different moods for your shots. This kit is affordable, portable, and easy to set up, making it ideal for both home use and small studio setups.
9. Lowepro Fastpack BP 250 AW II Camera Backpack
Carrying your gear safely is very important. The Lowepro Fastpack BP 250 AW II is a great camera backpack designed with compartments for cameras, lenses, laptops, and accessories. It’s comfortable to wear for long periods and has quick side access, which makes pulling out your camera fast and easy. Beginners will find this bag extremely helpful when traveling or going on photography walks.
10. Basics Cleaning Kit for DSLR and Mirrorless Cameras
Taking care of your gear ensures it lasts longer. The AmazonBasics Cleaning Kit includes a blower, microfiber cloth, cleaning solution, and brushes to safely clean your camera and lenses. Beginners often ignore cleaning, but dust and smudges can ruin photos. Having a cleaning kit at hand ensures your equipment stays in top condition.
Frequently Asked Questions
The main parts of a digital camera include the sensor, shutter, lens, aperture, and viewfinder. These components work together to capture and record images effectively.
- Sensor: The sensor is the heart of a digital camera. It captures light that passes through the lens and converts it into an electronic signal. The size and quality of the sensor determine the resolution and image quality of the photos. The larger the sensor, the better the image quality, especially in low light.
- Shutter: The shutter controls the amount of time light is allowed to reach the sensor. When you press the shutter button, the shutter opens for a fraction of a second, exposing the sensor to light. The faster the shutter speed, the better it can capture fast-moving objects without blur.
- Lens: The lens focuses the light that passes through it, directing it onto the sensor. Lenses come in various focal lengths, affecting how zoomed-in or wide the image appears. Different lenses offer unique optical characteristics, such as depth of field and clarity.
- Aperture: The aperture is an adjustable opening in the lens that controls how much light passes through. It also influences depth of field. A wider aperture (lower f-number) allows more light to enter, which is useful in low light conditions, while a smaller aperture (higher f-number) increases depth of field, keeping more of the image in focus.
- Viewfinder: The viewfinder allows the photographer to frame the shot and see the scene before taking the photo. In digital cameras, this can be either an optical or electronic viewfinder, with the latter showing a digital representation of the image you are about to capture.
Together, these components ensure that light is captured and translated into a clear, sharp image. The interplay between them allows photographers to control exposure, focus, and depth of field, making them essential tools for capturing high-quality photographs.
Shutter speed and aperture are both critical settings in photography, but they control different aspects of the image-capturing process.
- Shutter Speed: Shutter speed refers to the amount of time the camera's sensor is exposed to light. It is measured in seconds or fractions of a second, such as 1/1000, 1/500, 1/30, etc. A faster shutter speed, like 1/1000, results in a very brief exposure time, which is ideal for capturing fast-moving subjects without blur (e.g., sports or wildlife photography). On the other hand, a slower shutter speed, like 1/30 or 1 second, allows more light to hit the sensor for a longer duration. This is useful in low-light conditions or when you want to capture motion blur (e.g., flowing water or night photography). However, slower shutter speeds require a steady hand or a tripod to avoid camera shake.
- Aperture: Aperture controls the size of the opening in the lens through which light passes. It is represented by an "f" number, such as f/1.4, f/2.8, f/5.6, and so on. A lower f-number (e.g., f/1.4) means a wider aperture, which allows more light to enter the camera, making it ideal for low-light situations or achieving a shallow depth of field (where the subject is in focus, but the background is blurred). A higher f-number (e.g., f/16) results in a smaller aperture, allowing less light in but increasing the depth of field, meaning more of the scene will stay in focus.
In summary, shutter speed controls how long the sensor is exposed to light, while aperture controls how much light enters and affects the depth of field. Both settings work together to influence exposure and image quality. The key is balancing both to get the desired effect based on the lighting conditions and the type of photograph you are capturing.
There are several reasons why your photos might turn out blurry, even if you're using a good camera. The primary causes could include slow shutter speed, incorrect focus, or a wide aperture. Let’s break each one down:
- Slow Shutter Speed: If your shutter speed is too slow, the sensor is exposed to light for a longer period. This can result in motion blur, where moving subjects or even camera shake causes the image to appear soft and unclear. For example, when photographing in low light or at night, the camera may automatically use a slower shutter speed to capture more light, but this can lead to blur if there’s any movement.
Solution: Increase the shutter speed (e.g., 1/500s or faster) to freeze motion. If you're photographing a stationary object, a tripod can help prevent any camera shake during the exposure. - Incorrect Focus: If the camera is not focused properly on the subject, the photo will appear blurry. This can happen if the camera focuses on something other than the intended subject, or if the autofocus system struggles in low light or with subjects that lack contrast.
Solution: Ensure that you are focusing on the correct point. Use the autofocus points in your camera, or manually focus if needed. Also, check your lens to make sure it's properly calibrated and clean. - Wide Aperture (Shallow Depth of Field): A wide aperture (low f-number, like f/1.4 or f/2.8) allows more light to enter the camera, but it also results in a shallow depth of field, which means that only a small part of the image will be in focus. If the subject is outside this focused area, the photo will appear blurry.
Solution: Increase the aperture (higher f-number, like f/8 or f/11) to have more of the scene in focus. Alternatively, if you're using a wide aperture for creative purposes, make sure your subject is within the shallow focus zone.
In summary, blurry photos can often be fixed by adjusting your shutter speed, ensuring proper focus, or tweaking the aperture for better depth of field. Experimenting with these settings and understanding their effects will help you achieve sharp, clear images.
No, mirrorless cameras do not have optical viewfinders (OVF). Instead, they use electronic viewfinders (EVF) or LCD screens for composing and capturing images.
The key difference between mirrorless cameras and traditional DSLRs lies in the absence of a mirror system. In DSLR cameras, light passes through the lens, reflects off a mirror, and is directed into an optical viewfinder, allowing you to see exactly what the lens sees in real time. However, mirrorless cameras, as the name suggests, don't have this mirror mechanism.
Instead, light from the lens passes directly to the image sensor, and the EVF or LCD screen displays a digital preview of the scene. The electronic viewfinder (EVF) offers a real-time digital display, showing the exposure, white balance, and focus in the same way a live view does on the LCD screen. Some users find EVFs beneficial because they can provide additional information like a histogram and focus peaking directly in the viewfinder.
While mirrorless cameras lack an optical viewfinder, the EVF and LCD screen can offer enhanced features and flexibility, especially in low-light conditions, where an optical viewfinder might struggle. This makes mirrorless cameras popular for those seeking lighter and more compact systems without sacrificing modern technological advancements.
The f-stop is a number that refers to the size of the aperture opening in a camera lens. It plays a crucial role in controlling how much light enters the camera and affects the depth of field (how much of the scene is in focus). The f-stop scale is typically represented as f/1.4, f/2.8, f/5.6, f/8, and so on.
- Lower f-stop (e.g., f/1.4, f/2.8): A lower f-stop means a wider aperture (larger opening). This allows more light to pass through the lens, making it ideal for low-light situations. A wide aperture also creates a shallow depth of field, meaning only a small portion of the image is in focus, while the rest of the scene (especially the background) appears blurred. This effect is often used in portrait photography to create a soft, blurred background, drawing attention to the subject.
- Higher f-stop (e.g., f/8, f/16): A higher f-stop results in a smaller aperture (smaller opening), allowing less light to enter the camera. A smaller aperture increases the depth of field, meaning more of the scene will be in focus, both in the foreground and background. This is useful for landscape photography or situations where you want the entire scene to be sharp and clear.
In summary, the f-stop controls both exposure (how much light is allowed in) and depth of field (how much of the image is in focus). By adjusting the f-stop, photographers can control how their images look, balancing light and focus based on their creative goals.
The sensor captures light coming through the lens and converts it into a digital image. The sensor’s size and quality determine the resolution, detail, and low-light performance of your photos. Larger sensors usually offer better image quality, greater control over depth of field, and improved noise handling in low-light conditions, making them ideal for professional-grade photography.
The lens focuses light onto the camera sensor, which directly affects image sharpness, clarity, and distortion. High-quality lenses produce sharper images with better contrast and color accuracy. Additionally, different lenses (wide-angle, telephoto) influence the perspective and field of view, helping photographers create specific effects like background blur or wide landscapes.
A full-frame sensor is larger, capturing more light and offering better image quality, especially in low light. It also provides a wider field of view. A crop sensor is smaller, resulting in a narrower field of view due to the crop factor. Crop sensors are often more affordable and provide more reach with telephoto lenses, making them popular for wildlife and sports photography.
Digital cameras use phase detection or contrast detection to focus automatically. Phase detection is faster and more accurate, typically found in DSLR and mirrorless cameras, while contrast detection compares light differences to find focus, commonly used in compact cameras. Both methods allow the camera to quickly and precisely focus on subjects for sharp images.
White balance adjusts the color temperature of your photos to ensure that white objects appear white, regardless of lighting conditions. Different light sources (like daylight, tungsten, or fluorescent) can add color casts, affecting your image. Setting the correct white balance helps maintain accurate colors, making photos look more natural and visually appealing.

Pingback: The Easy Way to Learn Photography: A Step-by-Step Guide for Beginners - Beginners
Great post! I learned something new and interesting, which I also happen to cover on my blog. It would be great to get some feedback from those who share the same interest about Bitcoin, here is my website Webemail24 Thank you!
I’d have to verify with you here. Which isn’t one thing I normally do! I enjoy reading a publish that can make individuals think. Additionally, thanks for allowing me to remark!
You are most welcome. Its a nice to me about comments
You can definitely see your skills within the paintings you write. The sector hopes for more passionate writers such as you who aren’t afraid to say how they believe. All the time go after your heart.
Thank you so much for your kind words! It truly means a lot to hear that my passion comes through in my writing. I’ll keep sharing more, and I appreciate your support. Hope to see you around the blog!
I wish to show some appreciation to you just for rescuing me from such a condition. Right after looking out throughout the search engines and meeting strategies which are not powerful, I assumed my entire life was done. Living minus the answers to the problems you have sorted out all through your good article is a serious case, as well as those which could have adversely damaged my entire career if I hadn’t encountered your web blog. Your good talents and kindness in dealing with all the stuff was very useful. I am not sure what I would have done if I hadn’t discovered such a stuff like this. I can also at this point look ahead to my future. Thanks so much for the skilled and results-oriented guide. I won’t think twice to recommend your web sites to any individual who ought to have guidelines on this situation.
Thank you so much for your touching message. It truly means the world to me to know that my article could help you through a tough time. Your words inspire me to keep creating content that makes a real difference. I wish you all the best for your journey ahead—and I’m always here if you need more guidance!
You actually make it seem so easy with your presentation but I find this topic to be really something which I think I would never understand. It seems too complex and very broad for me. I’m looking forward for your next post, I will try to get the hang of it!
Thank you so much for your honesty and kind words! I truly appreciate that you’re trying to understand something new. Some topics can definitely feel complex at first, but trust me—it gets easier with time and practice. I’ll do my best to simplify things more in upcoming posts. Stay with me—we’ll learn together!
Hi, Neat post. There is a problem with your site in internet explorer, would test this… IE still is the market leader and a good portion of people will miss your fantastic writing because of this problem.
Hi, thank you so much for your valuable feedback! I really appreciate you pointing that out. I’ll definitely look into the issue and work on making the site better for all browsers, including Internet Explorer. Thanks again for your support and for helping me improve!
Happy to join conversations, share thoughts, and gain fresh perspectives along the way.
I like understanding different opinions and contributing whenever I can. Interested in hearing fresh thoughts and connecting with others.
Here is my website:https://automisto24.com.ua/
Welcome aboard! It’s always great to connect with open-minded individuals who enjoy meaningful conversations and fresh perspectives. I truly appreciate your interest and look forward to hearing more of your thoughts. Thanks for sharing your website too—I’ll definitely check it out!
me encantei com este site. Pra saber mais detalhes acesse o site e descubra mais. Todas as informações contidas são conteúdos relevantes e exclusivas. Tudo que você precisa saber está está lá.
Muito obrigado pelo carinho! Fico muito feliz em saber que você gostou do site. Estou sempre tentando compartilhar conteúdos úteis e interessantes. Volte sempre para conferir as novidades!
Its such as you learn my thoughts! You appear to grasp a lot approximately this, such as you wrote the ebook in it or something. I believe that you just can do with a few p.c. to power the message house a little bit, however instead of that, this is magnificent blog. A fantastic read. I will definitely be back.
Thank you so much for your wonderful feedback! I’m really glad that the content resonated with you. I appreciate your suggestion and will definitely work on making the messages even clearer and more impactful. Looking forward to having you back on the blog soon!
I like this weblog so much, saved to fav.
Thank you for your visit and appreciation. However, we prefer to keep the conversation respectful for all readers. Let’s focus on learning and sharing thoughtfully.
There are definitely a variety of particulars like that to take into consideration. That may be a nice level to bring up. I offer the thoughts above as general inspiration but clearly there are questions just like the one you deliver up where crucial thing might be working in sincere good faith. I don?t know if greatest practices have emerged round things like that, however I am sure that your job is clearly identified as a fair game. Each boys and girls feel the impact of just a moment’s pleasure, for the rest of their lives.
Thank you for such a thoughtful and reflective comment. I truly appreciate the way you’ve approached the topic with depth and sincerity. You’re absolutely right — even a single moment can leave a lasting impact, and it’s important we approach such matters with care and honesty. Your words add value to the conversation. Thanks again for sharing your perspective!
I have recently started a website, the info you provide on this web site has helped me greatly. Thanks for all of your time & work.
Thank you so much! I’m really happy to hear that the information here has been helpful to you. Congratulations on starting your website — wishing you all the best on your journey! If you ever need support or want to exchange ideas, feel free to reach out.
What’s up, the whole thing is going nicely here and ofcourse every one is sharing information,
that’s actually excellent, keep up writing.
Thank you so much for your kind words and support!
I’m really glad to hear everything’s going well on your end too. It’s always a pleasure to connect with people who value learning and sharing knowledge. I’ll definitely keep writing — stay tuned for more!
I truly enjoy studying on this web site, it holds excellent posts.
Thank you so much! I’m really glad you enjoy the content here. Your support means a lot — stay tuned for more great posts! 😊
Excellent read, I just passed this onto a friend who was doing some research on that. And he actually bought me lunch as I found it for him smile Therefore let me rephrase that: Thank you for lunch! “Life is a continual upgrade.” by J. Mark Wallace.
Thank you so much! I’m really glad it helped both of you — and what a sweet reward! 😊 Hope your friend found exactly what he needed. Feel free to visit again anytime.
I am not certain the place you’re getting your info, however great topic. I needs to spend a while finding out much more or understanding more. Thanks for great info I was on the lookout for this info for my mission.
Thank you for your comment! 😊 I’m glad you found the topic interesting and useful. I always try to provide accurate and helpful information, and I hope it continues to assist you in your work. Your feedback is greatly appreciated!
Very good site you have here but I was wondering if you knew of any community forums that cover the same topics discussed here? I’d really like to be a part of online community where I can get feed-back from other experienced people that share the same interest. If you have any recommendations, please let me know. Thanks a lot!
Thank you for your kind words! 😊 I’m glad you enjoy the site. For community forums, it depends on the topics you’re most interested in, but here are a few recommendations:
Reddit – subreddits related to your niche can be very helpful.
Quora – you can ask questions and get answers from experienced people.
Photography Talk / Digital Photography Review Forums – if your interest is photography.
Facebook Groups – there are many niche groups where people actively share advice.
These communities are great for feedback and learning from others. Hope this helps!
Thank you for plain and simple information. I plan to buy one this week and have about 3 weeks to learn it.
Is that enough time to learn the basics?
Also to clarify, I have to download from the camera to my computer?
Can you go through those steps also, please?
You’re most welcome—I’m glad the info helped! 🙌 Three weeks is definitely enough to learn the basics if you practice a little every day. Just focus on the core things: how to hold the camera, adjust exposure, focus, and frame your shots.
And yes, usually you transfer photos from the camera to your computer. The steps are pretty simple:
Turn off your camera.
Connect it to your computer with the USB cable (or insert the memory card into a card reader).
Your computer should detect the camera/memory card as a drive.
Open it, select your photos, and copy them into a folder on your computer.
Safely eject before disconnecting.
I can even walk you through editing basics once you get the files on your computer 😊
Can you post how to download pictures?
Of course! Let me walk you through how to download pictures from your camera to your computer in a simple step-by-step way.
Option 1: Using a USB Cable
Turn off your camera and connect it to your computer with the USB cable that came with your camera.
Turn the camera on – your computer should detect it.
On Windows:
A pop-up may appear asking what you want to do. Choose “Import pictures and videos”.
Or, open File Explorer → This PC → Camera/Device Name, then copy-paste the photos to your chosen folder.
On Mac:
Photos app may open automatically. If not, open Photos or Image Capture.
Select photos → click Import.
Option 2: Using a Memory Card Reader (faster & easier)
Remove the SD card from your camera.
Insert it into your computer’s SD card slot or use an external card reader.
Open File Explorer (Windows) or Finder (Mac).
Copy the photo files from the DCIM folder to your computer.
Option 3: Using Wi-Fi / Bluetooth (if your camera supports it)
Many modern cameras have apps (Canon Camera Connect, Nikon SnapBridge, Sony Imaging Edge, etc.).
Connect your camera wirelessly and transfer photos directly to your computer or phone.
Tip: Always copy your photos to a well-organized folder (for example: Pictures → 2025 → Trip to Cox’s Bazar). This way, you’ll find them easily later.
Respect to author, some superb selective information.
Thank you so much for the kind words! Really glad you found the information valuable. 🙏
Very interesting information!Perfect just what I was searching for!
Thank you so much for your kind comment! 😊 Glad to know you found exactly what you were looking for here. Hopefully, the upcoming posts will be just as helpful for you.